Monday, December 14, 2015

Kitten Wrestling Match

I love to watch the kittens play and took this series of photos of them playing on the couch the other day. They have all kinds of toys but prefer to play with each other more than the toys. The gray kitten is about half the size of the black one but she can still hold her own when it comes to the wrestling matchs.


2 Raincoats: Nau Succinct Trench and Lululemon Ride On Rain Jacket


It's been raining here all week, so the timing seems right to review some raincoats. For three years now I've been looking for a lightweight, waterproof, breathable raincoat that works well on a city bike, but found nothing. Now I've suddenly come across two. On the left is the Succinct Trench by Nau, purchased by me a few months ago via a discount website. On the right is the Ride On Rain Jacket by Lululemon, sent to me for review by the manufacturer. Both raincoats fit my requirements well.


Lululemon Ride On Rain Jacket

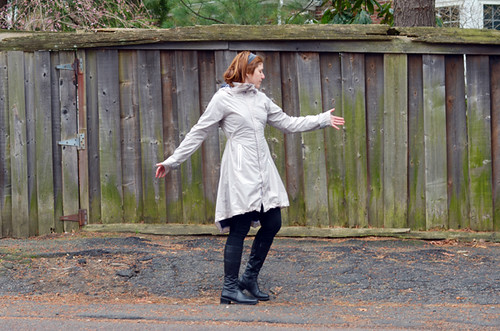
The Lululemon "Ride On" Rain Jacket is a rather avant-garde looking raincoat that hits a few inches above the knees in the front and an inch or so below the back of the knees in the rear. It has the same Edwardian theme as the blazer reviewed earlier, but here it is consistent and harmonious throughout the garment. The jacket is very thin and feels suitable for temperatures in the mid 40°s - mid 70°s Fahrenheit.


Lululemon Ride On Rain Jacket
The jacket is waterproof and breathable,lined with a soft, thin fabricthroughout. Lululemon uses cryptic proprietary names to describe their fabrics, and the stuff this jacket is made of is called "atmosphere." It is crinkly and easy to scrunch up and stuff into a pannier when not in use. It weighs very little. An inner drawcord at the waist makes the fit of this jacket adjustable. Overall the fit is pretty loose, but tightening the drawcord gives it a tailored, flattering look. Another drawcord controls the hem.


Lululemon Ride On Rain Jacket
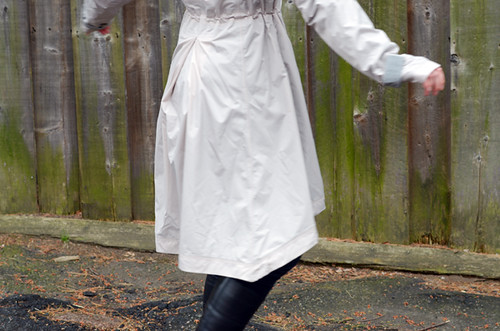
When the hem is let out, it is pretty flowy. Tightening the drawcord offers better protection from the rain.


Lululemon Ride On Rain Jacket

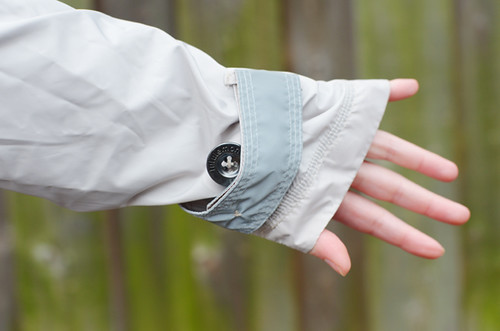
The sleeves are extra long, featuring cuffs with reflective detailing.


Lululemon Ride On Rain Jacket

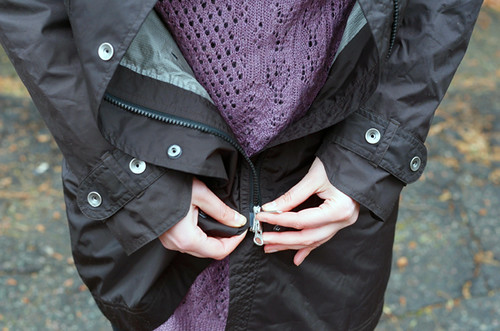
There is an inner and an outer zipper, the purpose of which I do not entirely understand. Lululemon calls this a "double zipper." However, neither of them are two-way, and the jacket cannot be unzipped from the bottom.


Lululemon Ride On Rain Jacket

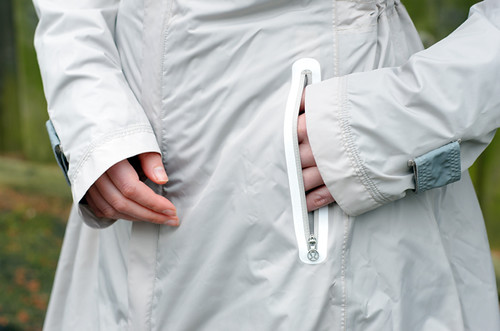
The front pockets have smallish zippered openings outlined with reflective ribbon They are very roomy inside and are lined with a soft, pleasant fabric. There is also an inner pocket.


Lululemon Ride On Rain Jacket
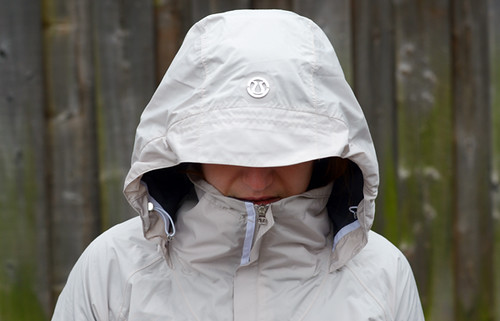
The collar zips up high and can be used in leu of a scarf. The hood is large enough to fit over a bicycle helmet, of so desired. It is is adjustable via a drawstring, but is not detachable.


Lululemon Ride On Rain Jacket

TheLululemon "Ride On" Rain Jacket works well for cycling because it is lightweight, waterproof, breathable, stretchy, makes minimal rustling noise, has longer than standard sleeves, and provides good rain coverage via a combination of its length and drawcord hem. At the same time it is sufficiently elegant to wear as part of an everyday, non-technical wardrobe. As far as criticisms: I found the fit of the hood to be less than optimal, with a slight tendency to obscure my peripheral vision unless I move it out of the way or push it back a bit. Hi-viz lovers might be disappointed by the subtlety of the reflective details, but this jacket is also available in orange (and black). The $298 price tag may or may not be a deal breaker, depending on what you are used to. And of course the flowing, Edwardian style is not everyone's cup of tea. Would I have bought this jacket for myself? Not at full retail price, but yes if it went on sale and if I did not already own the Nau trench (see below). After this review I will be giving it away locally. You can read another review of this jacket by Dottie on Let's Go Ride a Bike.


Nau Succinct Trench
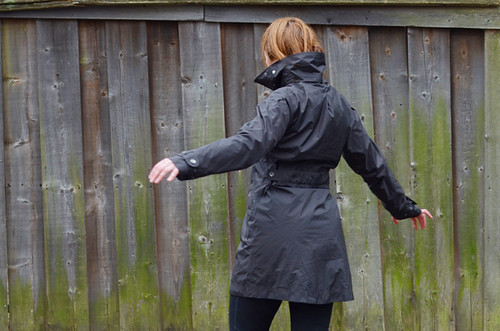
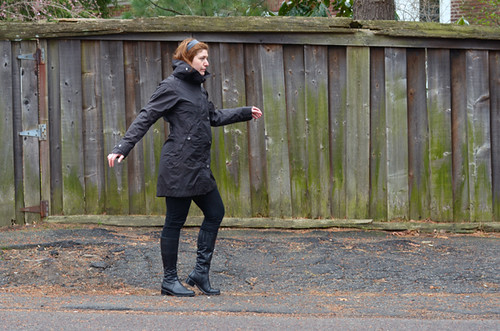
The Nau Succinct Trenchresembles a classic Barbour-style English field coat. It hits mid-thigh and is gently tailored at the waist. Made of an ultra-thin shell material, it is waterproof, breathable and lightweight,suitable for temperatures in the mid40°s - mid 70°s Fahrenheit. The fabric is described as "recycled polyester."


Nau Succinct Trench

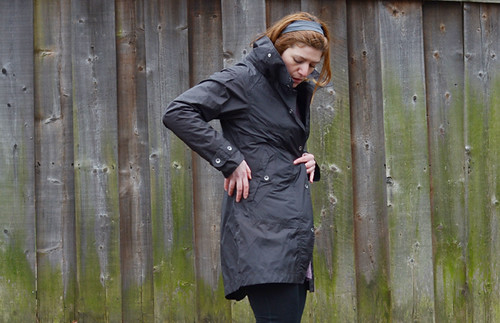
The jacket shown here is the model and the colour of the current model is a little different: The latter has black buttons instead of silver and a very subtle black-on-black plaid pattern. In all other ways they are the same (I asked the manufacturer).


Nau Succinct Trench


The Nau trench is simple, compact and decidedly utilitarian in design. Those who do not like to fuss with drawcords and adjust things back and forth, will enjoy its intuitive versatility.


Nau Succinct Trench

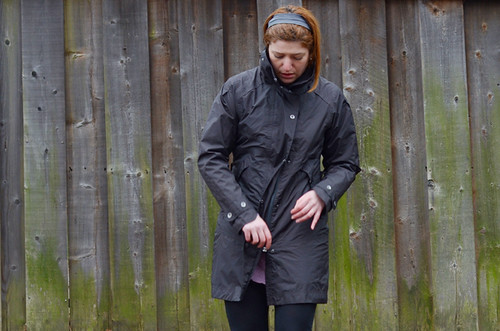
The two-way zipper and rear vent make it easy to adjust the width of the hem for pedaling, walking, and other activities .


Nau Succinct Trench
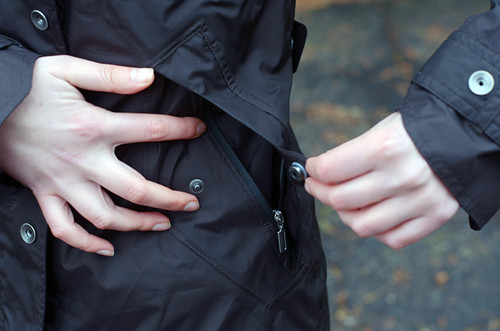
The roomy, covered pockets feature both zip and snap closure, allowing both easy access of weather-proofing.


Nau Succinct Trench
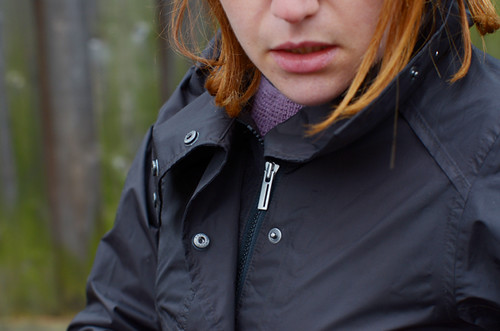
The stand-up collar can be buttoned up to protect the neck from rain and wind, or let out.


Nau Succinct Trench

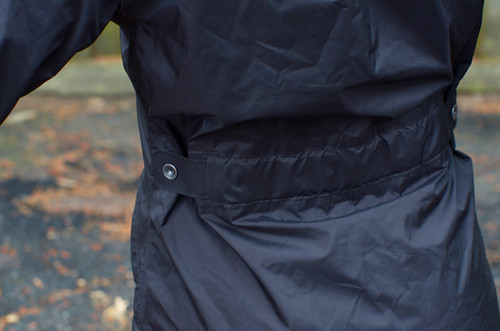
The waist is adjustable.


Nau Succinct Trench
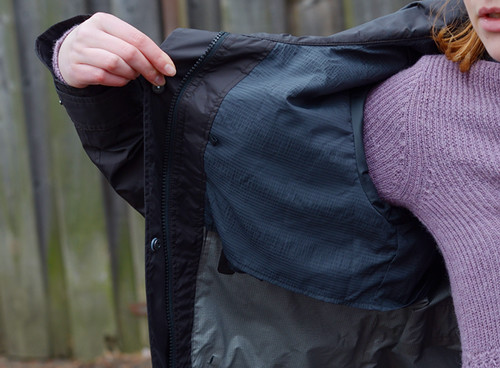
Only the upper 3rd of the trench is lined, reducing weight and bulk.


Nau Succinct Trench

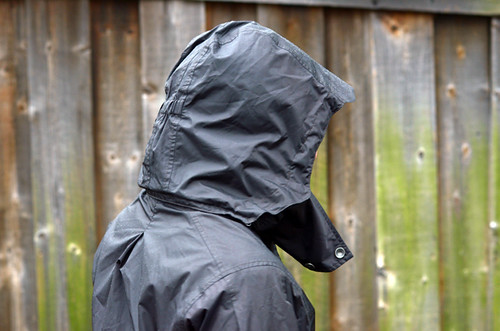
The detachable, visored hood features both a zipper,snap closure and a hidden draw-cord, allowing for a number of micro-adjustments for optimal fit.


Nau Succinct Trench
The NauSuccinct Trench works well for cycling because it is lightweight, waterproof, breathable, easy to move in, makes minimal rustling noise, has longer than standard sleeves, and provides coverage of the derriere and upper thighs. A classic design, it is sufficiently elegant to wear as part of an everyday, non-technical wardrobe and is unlikely to go out of style over the next few years. The detachable hood offers extra versatility, and does not obscure peripheral vision. As far as criticisms: Making the trench slightly longer would provide better rain coverage for cyclists. Adding a few reflective elements will be attractive to those who require that their rain jacket be hi-viz. Personally I would love to see this jacket in a classic colour other than black - for instance olive green. The $275 price tag may or may not be a deal breaker, depending on what you are used to. I bought mine for 40% off via a discount retailer at the end of last season, and those who find the retail price too high can always wait, stalk, and do the same.


I find both the Nau Succinct Trench and the Lululemon Ride on Rain Jacket to be flattering, practical, and cycling-appropariate, assuming that you ride an upright bike and are looking for a raincoat that is suitable as everyday clothing. The Lululemon jacket is probably the more stylish of the two considering current trends, but it is also the more likely to look dated a couple of years down the road. For me, that skews things in favour of the Nau trench, but others' preferences may differ. Both raincoats are good examples of cycling-appropriate apparel. By comparison, my older raincoat is considerably bulkier and more constricting on the bike. I am glad to have finally found a replacement.

Sunday, December 13, 2015

Moose Meadows, Pigeon River


(Click the photo to view a larger version)

This photograph was made from the Pigeon River Helipad and Overlook on Otter Lake Forest Road in Northeast Minnesota. Ever since the forest service created this helipad and overlook, I've been stopping there whenever I'm in the area in the hopes of seeing a Moose down along the river. Being quite familiar with the river from the seat of a kayak, I knew that this bend in the river was quite popular with the Moose. However, I had never seen one from the overlook until today! I watched through my telephoto lens as the Moose moved throughout the shallows for several minutes. Eventually he turned and gave me a nice profile of his body. It was cool to finally see a Moose from this vantage point! This marks my 18th Moose sighting of this year!

Friday, December 11, 2015

Making Jelly

I have been trying my hand at making jelly since we had such a large crop of apples and peaches this summer. Making jelly is a long, time consuming process.

First you pick the fruit. Then you wash the fruit, cut it open and in the case of apples you can get the juice in several ways. One way it to simply cut the apples in at least quarter pieces, the smaller the better and cook them. Or if you want you can core the apples and cut into small pieces and cook them. You can peel them but you are loosing a lot of juice doing that as it does when you core them. Once the apples have cooked for an hour or so they will be very soft and mushy. Let the fruit cool until it can be handled. The most efficient way I found was to put several pieces of cheesecloth layered together in the ricer, or sieve and use a large metal spoon to smash the fruit causing the juice to leak through the cloth and sieve and into a large container under the sieve. When the fruit was all smashed I would pull the cloth out of the sieve, remove the sieve from the container and holding the top of the cloth closed with one hand I would squash the apple pulp in the cloth to get the rest of the juice out. Refrigerate until ready to make the jelly.

For the peaches I would wash them, cut them open removing the pit and cook the fruit following the same procedureas for the apples.This works for almost all fruit.

Now to the jelly. Heat the juice until warm. At the same time heat a large (and I mean large) pan of water with a lid for sterilizing thejelly jars. You can buy largecanning pots with a lid andmetal basket in it that work well. Mine is about five gallon pot. The jars I use for jellyare half pint jars. I use pint jars for canning applesauce, and apple slices, and peach slices. Wash the jars, their screw onrings and the sealinglids that have a rubber seal around the edge that come with them.When you first buy jars they will have all three parts but jars andscrew on rings can be used over and over. Never use an already used sealing ring. It won't work properly.You just have to buy new sealing lids each time you seal a jar.

When the waterin the large pot is boilinggentlydropjust the jars in the water to sterilize them. While that is happening add a packet ifSureJell to the juice and bringto a full rolling boil that can't be stirred down. Add the sugar. (SureJell has information on how to do this in all packets of Sure Jell and each kind of fruitneeds a different amout of juice per sugar amount.) Again bring to a boil and stir one minute at full rolling boil that can't be stirred down.You can skim the small amount of foam off the top if you want.

You should now have very hot jelly.

I did the first batch of apple jelly and it came out perfectly.

Oh, but the second batch didn't. It wasn't boiling and it wasn't boiling and I turned my back on it for about 15 seconds and it came to a boil and went all over the stove top, down the side of the stove both outside the door and inside the oven door. And all over the floor and under the stove.

What a mess!

I was able to rescue 7 jars of jellyof the 9 I had figured for. And it jelled and was fine. By the time hubby came in I had cleaned up most of the jelly on the stove top and down the door. But he had to help me pull out the stove and clean the floor under it.

OK I thought. Something always has to go wrong with cooking. this should be all of it.

I froze 8 quarts of peaches in the freezer and canned 6 pints of applesauce as well as having about 3 pints I kept for eating right away.

Next was some peach jelly. Horrors! It didn't jell!

I tried the information for redoing the jelly on the SureJell packet when it doesn't jell and it still didn't jell. I called them. They told me they didn't have any information except what was on the packet. (So why are there people you can call for help?)

I opened all the sealed jars, dumped them in the pot for cooking the jelly, started over but didn't add any sugar. but did add another packet of SureJell. It worked. Peach jelly jelled.

Now I have done a batch of jelly of half peach and half apple juice mixed together. I is good jelly.


Hubby has been pealing apples for more applesauce so I guess I know what I'll be doing tomorrow.

Thursday, December 10, 2015

Moving On :: A Jog in the Road Back

Monday, August 30th - - Highway 37A west from Cassiar Highway (in British Columbia) is also known as Glacier Highway. Though the clouds had moved in and were hovering over the tops of the mountains, portions of a few of the glaciers could be seen from the highway, which began in a wide valley but soon narrowed. A river on the left and the mountains on both sides dominated the views. Numerous waterfalls and streams could be seen cascading down the sides of the mountains. Along with the clouds came the rain, sometimes heavy, and I drove slowly through the valley, savoring its beauty.

One of the streams/waterfalls that drop hundreds of feet down the mountain side along the Glacier Highway.

Halfway to Stewart the valley expanded once more. A first glimpse of Stewart, in the rain and early evening twilight, was not impressive. It looked drab and run-down. I passed by an RV Park and went on to the Municipal Campground, which was in a heavily forested area. It looked dark under the trees even though it was still early evening. But it offered flush toilets and hot showers, so it got the nod for the night!

==========

Tuesday, August 31st - - Stewart didn't look much better when I drove through town this morning. It was drizzling rain and it was foggy. Visualize a small town in America in the 1950s then move forward 60 years but make no changes to the town. Old buildings add character to a place but most of these buildings were way past their prime.

I stopped at the Visitor Center, which appeared to be one of the newest buildings in town, and picked up a self-guiding car-tour map of the road that goes to Hyder, Alaska and which continues on to Salmon Glacier. I was informed by the nice lady that it is a dirt road but once you get through Hyder and beyond the Bear Viewing Platform and get back into British Columbia, the road is well maintained and in good condition. The implication was that the U.S. portion of the road wasn't in good shape. Well, it wasn't implied, she came right out and said that the U.S. portion of the road was terrible! It had potholes and washboard areas and was narrow in spots – but it was only for a couple of miles. It's safe, she said, just take it easy.

Throwing caution to the wind, I drove up that road. Slowly and carefully, taking it easy. I've avoided traveling on dirt/gravel roads as much as possible. I just don't like them. But sometimes you have to risk it and hope that the risks are worth the rewards. They were.

Hyder, Alaska (four miles from downtown Stewart) is a small town of 100 happy souls, and one old grouch. So says a sign on one of the old, rugged buildings. The dirt road, the rain, and the fog didn't add much to the appeal of the place. There were about 20 old buildings (some were in use as small shops) and two RV Parks along with a Post Office and a General Store.

I stopped at the Bear Viewing Platform (about 3 miles from Hyder) that is managed by the National Forest Service. No bears were in sight and none had been seen yet today. The Ranger said a mother with her cubs usually comes in about noon and again about six o'clock. It was only nine so I continued on to Salmon Glacier seventeen miles further up the road.

Six miles from the Bear Viewing Platform, I crossed back into British Columbia. And the road got considerably better, as promised. All this time the road is going up. And it keeps going up as well as winding itself around the side of the mountain. And it is still drizzling rain. Ten miles further there is a turnout and I get my first look at Salmon Glacier. Splendid!

The river of ice fills the valley below and continues on up and around the mountain peak on the left. Those black streaks are dirt and rocks that the glacier has picked up as it moves imperceptibly over the mountains.

It would not be an easy task, if even possible, to hike over this.
Crevasses and holes would make it a rather treacherous journey. These aren't just ripples in the surface, they are deep. Perhaps a hundred feet or more.

Salmon Glacier from another turnout two miles north. The clouds and fog obscured the little bit of sun that occasionally came through.

The Salmon Glacier is the fifth largest glacier in Canada and is a remnant of the last glaciation period which occurred 14,000 years ago. What I saw and what is shown here are but a very small portion of the glacier which extends way back beyond the horizon.

The sun did make an appearance now and then and the rain finally stopped - briefly. Down in the valley and a few miles to the south are the towns of Hyder, Alaska and Stewart, British Columbia.

Even more slowly than going up, I made my way back down the mountain. I stopped at the Bear Viewing Platform for about 45 minutes. Saw a lot of Chum Salmon in the river, both dead and spawning, but no bears. And the sun was, once more, hidden by the clouds.

I returned to Cassiar Highway and the long drive south, stopping at the town of Smithers for the night. And the rain? It seems that it was the first that Stewart/Hyder had seen in two months! And it followed me to Smithers where I learned that they too hadn't had rain for many weeks.

Wednesday, December 9, 2015

Scottish Sport Climbs guide is here


Finally, we have the first stock of the new Scottish Sport Climbs guidebook by the SMC. It’s in the shop here. It has certainly been a long time coming. I first submitted a draft of the sections I wrote in November 2004! A lot of bolts have appeared across the lowlands, highlands and islands since then, so the book is a lot fatter than it would’ve been if it had been released at that time. So the wait has an upside.


Flicking through the guide as I took it out of the box, I was struck by the great selection of sport crags all over the country now. There are 1300 routes in the guide, on 100 crags. Who out of the slightly older generation of Scottish climbers would’ve thought we would have 1300 sport climbs in Scotland. That’s great! As you’d expect from an SMC guidebook it’s a nicely produced book with careful descriptions, good maps and plenty of nice pictures to inspire. So many of Scotland’s new routing activists have been very energetic over the past decade and the options now available for routes to enjoy has basically exploded. Now, there are sport crags for us to visit no matter what corner of Scotland you find yourself in or fancy travelling to. Also, the diversity of locations mean that I can’t see many days of the year where there won’t be some dry rock on which to clip bolts somewhere in the land.


Kudos to all who made the effort to open new sport routes, as well as all the authors and producers of the guide. It is so badly needed. Talking to the new generation of young sport climbers coming into climbing through Scotland’s climbing walls, it frequently nagged at me that so many are unaware of the lovely crags that are out there. Some of them in stunning, wild and far flung locations like Gruinard in the north west. Some of them just up the road from our major towns and cities.


The guidebook pictures brought back some nice memories for me of places like Dunglas just outside Glasgow, where I did my first 6b (Negotiations With Isaac)and 6c+ (The Beef Monster). I remember being very excited when Andy Gallagher asked me to give him a belay on the first ascent of Persistence of Vision (7a+) after watching him bolt it. A year after my first 6c+, my first 7c+ (Dum Dum Boys) was a liberating experience and straight away I wanted to get to the ‘happening crags’ of the day.


I found myself at Steall for the first time shortly afterwards, abseiling down Cubby’s project (Ring of Steall 8c+) and being totally inspired by how poor the holds were. The whole ambience of hard physical climbing in beautiful highland surroundings was where it was at for me. So in the following years, we made after school/uni/work hits from Glasgow to Glen Ogle, Dunkeld and Loch Lomondside sport crags, with weekend trips to Tunnel Wall, Steall, Weem and the Angus Quarries.


Once I got involved in exploring new routes, under the influence of Dave Redpath and Michael Tweedley, I immensely enjoyed tearing about bendy roads in Argyll developing crags like Tighnabruaich and eventually the Anvil.


One thing that I like about Scottish sport climbing particularly is that the easier graded routes in the 6s and 7s are often so much better to climb than those on the continent. In Spain or suchlike, the majority of the time, the hard routes on big overhanging sweeps of limestone are the most inspiring lines, while the easier lines can sometimes be either a bit scrappy or, dare I say it, a little boring. As with our trad, the variety of rock types we have in Scotland often make for much nicer routes in the lower and mid grades too. However, if you are into hard stuff, the two hardest routes in the book (Hunger, 9a and Fight The Feeling, 9a) give as good climbing as you’ll get anywhere. Both were climbed in good conditions in the summer and you wont find any queues or some barky dog wondering about eating your lunch at the base of the crag. The only negative on offer from Scottish sport climbing is, of course, the midge. Just remember that the wind direction is as important as the rain when you look at the forecast. Choose a crag exposed to a breeze on the day, and you’re sorted.


Enjoy the guide, enjoy the climbing. It’s here.

Tuesday, December 8, 2015

Bike on the T: a Mini Adventure

Sogreni, Boston MA
A couple of days ago I happened to visit a bike shop in downtown Boston and the owner had an interesting bicycle in the back - very unusual to see in the US. I commented on it, and he uttered this fateful reply: "Oh this thing? Take it, please!Get it out of here!" And he made me an offer I could not refuse - dared not refuse. Before I knew it, I was standing by the Boston Harbor with the bike, grinning like a madwoman at my unexpected acquisition.


But once the euphoria subsided, the reality of it hit. Missing a saddle, seatpost and front brake, the bike was not ridable and I lived 4 miles away. There was no way I was rolling it all the way home. It was time to try the dreaded "bike on the T." I had heard horror stories about it from others, but now I would find out for myself.


In Boston, bikes areallowed on the subwayon weekdays before 7am, between 10am and 4pm, and after 7pm. It was now 3pm, so I was just in the nick of time before the evening rush hour ban.I walked the bike to South Station and looked for an entrance that indicated the presence of an elevator. I could not find one, and rather than try every single entrance decided to carry the bike down the stairs. It was on the heavy side, but easy to hold by the top tube - overall, not too bad.


Bike on the T: Entrance
Once underground, I headed for the extra-wide handicapped entrance, slid my "Charlie card" along the electronic reader, and like magic I was in. The bike got a lot of looks from passers-by, and a couple of people asked me sympathetically whether my saddle had been stolen. The station was not too crowded, and rolling the bike along did not present any difficulties.


Red Line Elevator
Knowing that a series of staircases awaited in order to reach the platform, this time I made it a point to look for an elevator. I found one pretty quickly.


Bike on the T: Elevator
It was a roomy elevator, with plenty of space for bikes, wheelchairs and baby strollers. I pressed the button that indicated the platform I needed to get to, then disembarked when the elevator stopped at that floor.


Bike on the T: Stairs Despite Elevator
Immediately there was a sign for the platform, but then... more stairs despite having taken the elevator! It is possible that I did something wrong, but the elevator did indicate that this was the correct place to disembark. Confusing, though I was fine carrying the bike down some more stairs.


Bike on the T: Train Platform
Finally I was at the platform, waitingwith a decent-sized crowd of othersfor the train to arrive. I began to strategise: I would try to enter so as to get in the corner of the car, where I could stay close to the door and have some space. As the train pulled up, I could see that some of the cars were emptier than others, and quickly walked toward one of those.


Bike on the T: Red Line, 3pm
As planned, I was able to get into the corner of the car and stay close to the door. There was even an empty seat, and I positioned the bike in front of me at an angle, so that the people in the seats next to me could come and go without the bike blocking their way. The ride was bumpy, and I wedged the front wheel between my knees in addition to holding the bike, to keep it stable. The other passengers steered clear of the bike and did not bump it or brush up against it, which was nice (whenI mentioned this to the Co-Habitant later, he suggested they were probably afraid to get their clothes dirty - the bike looked filthy!). Once the train reached my station, I got up and rolled the bike backwards out of the train - not difficult as we were right by the door.


Sogreni, Cambridge MA
At the station, I decided not to even bother looking for an elevator and took the bike on a series of escalators.Then I rolled it home, which was a 12 minute walk.


Overall, I would describe my experience of taking a bike on the T in Boston as unproblematic. It is of course crucial to pay attention to the rules regarding which trains allow bikes and when, and to plan accordingly. If your bike is so heavy that you cannot carry it up and down stairs, I would also suggest looking at station maps beforehand to familiarise yourself with the locations of elevators; they are not always obvious. As the train arrives, keeping an eye on the cars and aiming for one of the emptier ones is a good idea, and looking for a spot in the corner of the car will ensure proximity to the doors. If you find that the car is getting crowded as your station nears, you could warn people that you are getting off at the next stop and will need to wheel your bike out. Other than that, I cannot really think of any additional advice.


In close to three years of cycling in Boston, this was my first time taking a bike on the subway and I am glad it went well. Now, to find a seatpost for this bike...