Icefield's Parkway - Polar Circus
"Polar Circus is a popular and classic ice climb located in the Canadian Rockies off the Icefields Parkway. Climbers from throughout the world come to Canada to test their skills (and empty their bladders, sometimes unintentionally) on this incredible, 700 meter tiered frozen waterfall. Originally rated Grade VI, the first ascent of this route required eight days, fixed ropes, and substantial aid on the steepest sections. In what was to become a typical situation on this beautiful wall, the climb was crowded even during the first ascent, with two parties competing for the prize. The second ascent party, narrowly missing being the first to bag this great line, eliminated all but five meters of aid from the route. With the evolution of modern tools and techniques, "Circus" has since been downgraded to Grade V, WI5, and is typically climbed by competent teams in a long day from the Icefields Parkway."With a 5 minute approach from the road this is one of the WI2+pitches that start up theCirrus Mtn Gully aka theCanadian water ice classic...."Polar Circus". Below: looking up the first of thethose early easy pitches in early Jan. conditions. The perfect warm up for the climbingto come. 1st step on the approach.

A bit more of easy climbing(appro. 200m) leads you to the first steep section of water ice. 2nd step on the approach below. And then yet some more rambling to get to the base of the first steep pitch on the route.

Below is going up the gully and turning right to start the first steep pitch. Chain and boltrap anchors on the right at the top of the pitch.

Below, looking down from the start of that pitch.

Polar Circus '80, in easy ice conditions...the first steep bit that blocks access to the upper gully. Depending on conditions any where from WI3+ to WI 4.

The same pitch in Feb and a bit steeper and more sustained.

Same pitch early Jan and much steeper than it first appears.

Late in the season,with safe avi conditionsand on warm, soft ice, Polar Circus can bean easy (WI4+/ 5-), and super classic one day ice climb. With an short approach and quick descent it is oneto go back to again and again.
The first snow section below:

Below is the last section of ice (WI2/3) before the snow gully and short ice steps below the Pencil.

On top of that pitch, again 1980 with bivy gear (the 80/81 winterseason turned Polar Circusfrom an over night climbto a one day route). This is atthe beginning of the long snow gully below the Pencil.

And the Pencil's snow gully below:


Below, turning the Pencil (which is obvious, directly above) on it's right hand side.

This is looking down the snow gully section just after turning the easy ice at the base of the Pencil which is on the right of this picture and just out of sight. Climber's right, then leftand up hill of this pictureis the avi prone slope.

Turning the Pencil just below and gaining the avi slope. Short bitsof up to WI4 and a lot of easy ice steps and easy snow terrain are below this. Spectacular position! The avi slope goes up and out to the right and then back left, up and then left again into the upper bowl above. That final level traverse back into the basin and the upper tiers can be really scary because of the sun exposure and snow conditions.
John Lauchlan in this picture and belowthearea where he was likelyswept away in an avalanche while trying to make the first solo ascent in the early winter of 1982.

Ray Jotterand photo 1979
The unformed Pencil's bottom stub.

Partially formed Pencil in early Jan.

Looking up from the firstright hand sectionof snow traverse above the Pencil. At the trees in the picture the track jogs back left, up and left againinto the huge upper bowl.

Below is the upper left hand traverse which can be a little spooky if the snow conditions are bad.
In thepicture below we are belaying the entire traverse..which is a new one for me. Likely we shouldn't have been there at all in those snow conditons. We made do.
 Get there early while the traverseis still in the shade!
The last four pitches of the climb (or 3 rope stretching pitches with a 60 or 70mrope and some imagination) and for a strong party these might be the only pitchesyou rope up on in good conditions. In early Jan of '75 the first ascent partyclimbed 14 roped pitches of ice and taken 8 days up and down. Water fall climbing was stillnew and nothing this long or this cold had been done before. Charlie Porter, the Burgess Twins and Bugs McKeith were some of the most accomplished climbers of their generation at the time. The second ascent lead by Canadian, Laurie Skreslet, literally following in the 1st ascent teamsfoot steps, donein two days and all but the last short bit of itfree.
Huge admiration for both team'simagination,tenacity and skills. Ice climbing changed faster than anyone ever thought possiblebetween 1975 and 1980.
The upper bowl from lower on the route.

The upper bowl when you turnthe corner on the snow traverse. Good look at the first fun pitch on the first tier of the 3 uppertiers. The upper tiers are made up ofthis pitch (70M+), the Ribbon pitch and the final head wall of ice (2 pitches).

Below, the bivy cave used by allthe early ascents up to 1980.

Below, theRibbon pitch.

Difficulty on this pitch depends on the amount of ice some what but more importantly what time you get there, the temps and how wet the ice is. This pitch caneasily be running with water and nothing but rotten ice.

You are looking at entirelast set of tiers in this picture. The three climbers at the right side of the ice are at the base of the Ribbon pitch in fat, lateFeb '10 conditions.


Parts of the the last longpitch (or two short pitches)are shown here on the last tier. Fixed anchors on the right with a decent belay platform and rap chains. Climber here is on the last bit of steep ice and generally the crux of the route.

The final short pitch to finish the climb..steeper than it looks and generally sun rotted ice by the time you get on it. Perfect finish to a great climb! Picture is taken for the chained belay anchor and rap point.

For shortened view of the last tier. Chains on the rock are climber's right with a good ledge,one small stepabove the climber in the picture. The belay becomes pretty obviouswhen you are there. More so than in thispicture.

Looking back down the final pitch just below the last set of rap chains. Incredible piece of ice!

The always terrifing, free hanging rap off the Pencil on the way down. And not always the easiest rap station to find in the dark if it has been snowing. My suggestion is when in doubt "follow the water course" into thegully. You want thethird one on the far right. From the upper tier you walk to the first station(fixed pins and tat) that are on the left wall (looking down) where it narrows and steepens. The second setare fixed pins and tat again, this timeon the right hand side of the gully when facing down hill. The wrong gullies start outmuch steeper than the correct rap line. If it seems too weird and scary go north a gully...or two. You want teh tird gull on the north side of the bench.

A wonderful climb to be done over and over again just for the fun of it!
Polar Circus topo courtesy of Joe Palma copyright 2007
Some chainachors were replaced and new ones installed in the spring/fall of
Dbl click to enlarge the topo and check out the rap line, depending on conditions and daylightif might be a little confusing first time up the route.

Another topo here worth looking at as well:
http://lamountaineers.org/NAC/browserf/climbs/polarcir/topo.pdf
Gear Notes:
These days all but the lastrap anchorare bolts, fixed chains or pins and tat. You will rap straight over the Pencil so be careful there of you or your rope knocking anything down. 70m ropes are really much easier but 60m ropes will work as well. Take some tat for V threads but make sure someone hasn't beat you to it already. V threads get burried quicky on the upper pitches where you might need them so come prepared.
Be really careful on the avi slop above the Pencil...it has been fatal. It has three sections, a right hand traverse, a left hand traverse and short up hill and a final long left hand traverse which is a good sized slope show in the pictures above. A slides here will dump debrisinto the canyon below the Pencil.
Avi danger in particular on this route can be very high. Even small slidescoming out of the upper bowl while on the last 3 tiers will be serious.
Worth a look at the photos here:
http://www.pc.gc.ca/eng/pn-np/ab/banff/visit/visit7a12/visit7a12c-3/Polar%20Circus.aspx
and no the photos arenot photo shopped.....
A dozen screws should be plenty for anyone capable of finishing the climb. In good conditions plan on anywhere from 5 to 3 roped pitches depending on the length of your rope and a lot of easy ice either soloed or climbed together.
A early start will get you off before the south facing avi slopes heat up. Or better yet do it on a snowy, cloudy and cold day. You can avoid the avi danger and soft, rotten ice on the crux pitch if you do without the sun. Don't forget 3 or 4 long screws just for that rotten ice late in the day.
8 or 9 hrs round trip, car to car, these days is a reasonable time with good ice and snow conditions. 5 or 6 hrs of climbing. A hook fest on hammered out ice will make it quicker. A lot of snow to break trail through or really cold, new ice canmake it a "slightly" longer day.There is a reason the climb is rated a V for over all grade and time.
Approach Notes:
On a good day 10 minutes up a boot packed trail from the road. Cowboy-up and start on the first easy ice available instead of walking up the snow slope to the left and beginning of the first WI4 pitch.
 We occasionally moved in close to shore looking for otters, seals, whales and puffins.
 The fog and clouds provided an eery aspect to the landscape.
 For me, the highlight of the cruise was seeing Aialik Glacier, the largest tidewater glacier in Alaska. It is a mile wide and extends four miles back to the Harding Ice Fields. At least I think that is what the captain of our cruise ship said. He was providing so much information that it was not easily absorbed if you weren't paying close attention, which I wasn't always doing! At this point we were still quite a ways away. The top of the glacier was hidden by the clouds and fog and chunks of ice were not yet visible in the water.
 This little boat was about half a mile away from the glacier, along it's left side.
 The Kenai Star was similar to the cruise ship Tanaina, which we were on. The smaller boat on the right is the same one as in the previous photo only it has now moved across to the right side of the glacier.
 Towards the end of our short stay, the fog lifted briefly so that we could actually see the top of the glacier. Quite a few chunks of ice fell off (calved) while we were there. The sound when they broke away was awesome, rather like really loud, close thunderclaps. Not rolling thunder, but quick, short bursts. And it was pure luck if you got a good shot of the glacier calving (I didn't).
 The Kenai Star is pulling away from the glacier. It is difficult to comprehend the massiveness of this glacier, even with boats in the picture.
 Steller Sea Lions resting on the rocks.
 We saw this black bear on the beach, not far from where a group of campers had their tents set up. They hadn't yet noticed the bear and one of the campers was waving back at us while we were trying to point out the bear to him.
 The camper didn't have a clue there was any danger until one of the other campers finally saw the bear when it crossed over the top of the rocks. Luckily, for the campers, it headed straight into the forest.

 Sometimes I get emails where ladies send me pictures of their bicycle and ask whether I think "it would look better" with dress guards and/or a chaincase. Ladies... You do realise that these things are not there for the looks, right? Although a set of dress guards and a chaincasedo lend a certain charm to a bicycle, aesthetics are not their primary purpose. So let me explain why I put them on my bikes, and then you can decide for yourself whether you need them or not.
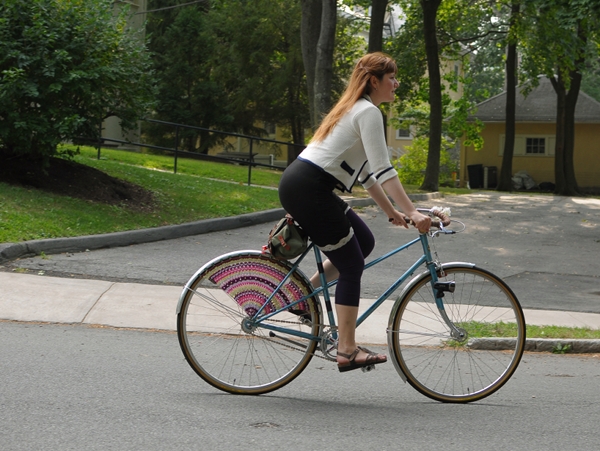 The purpose of dress guards is to stop fluttery, loose clothing from flying into the spokes of your rear wheel and either getting ruined or causing an accident.The main determinant of whether you need dressguards is whether you wearthe sort of clothing that requires their protection - for instance: flared skirts, dresses, long coats, or flowing tunics. Once you have had something get stuck in your rear spokes or have seen it happen to someone else, you know that the possibility is real and that it can even cause injury. Personally,I will not ride a bicycle without dress guards if an article of clothing I am wearing is long enough to reach the rear spokes. And since much of my everyday clothing is in that category, it is a good idea for me to install dress guards on any bike I plan to use for transportation.
 I have also been asked what kind of dressguards are better: netted or solid. There are probably differing opinions on this, but in my experience it does not matter. My vintage Raleigh(above) is fitted with very minimal dressguards that are basically just stretchy cords fanning out from the rear dropouts. For me, this has been sufficient; the cords - closely spaced - provide a perfectly functional barrier.The obvious advantage to dress guards that are woven, is that they are lighter (and usually more attractive) than plastic ones. The disadvantage is that they can be more expensive and more difficult to clean.
 Moving on to chaincases, their purpose is two-fold: (1) to prevent the bottoms of your trousers from being caught in the chain, and (2) to keep the chain clean from street grime, especially in bad weather. Since I seldom wear long trousers, the first function is not that important to me. So while I do appreciate that the chaincase keeps my chain nice and clean, this accessory is not as crucial for me as dress guards, because it is a maintenance feature rather than a safety feature. I can still ride a bike without a chaincase for transportation.
 Furthermore, while I have found dress guards to be effective in preventing clothing from getting stuck in the spokes, I have not found chaincases to be entirely effective on those rare occasions when I do wear trousers. A couple of times, the bottoms of my trousers have actually gotten stuck on the chaincase itself, which has only increased my bias for skirts once I started cycling. Don't get me wrong, I still love a nice, elegant chaincase. But I admit that this feature does not hold as much functional purpose for me as do dress guards.
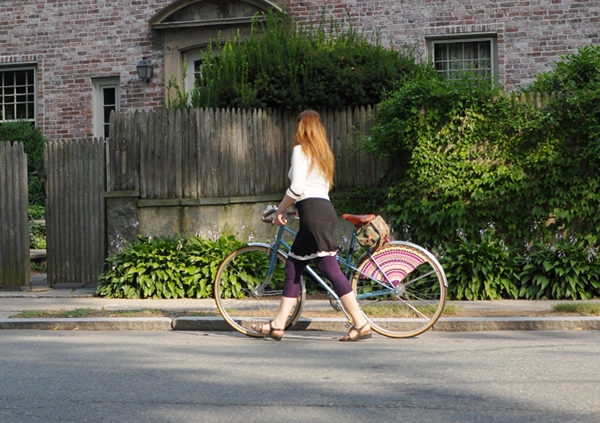 Dress guards and chaincases are not affectations, but necessary accessories for transportation in everyday clothing. As the popularity of "city bikes" rises, I hope that more American bicycle shops will realise this, and start carrying these useful items.