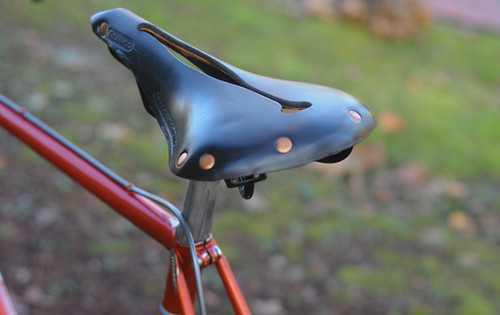
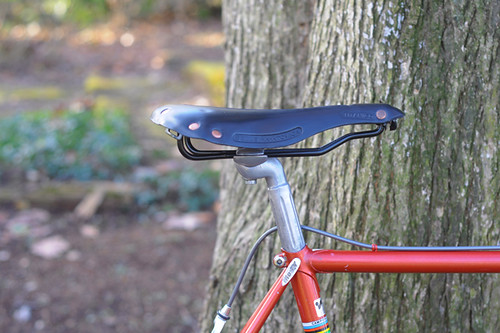
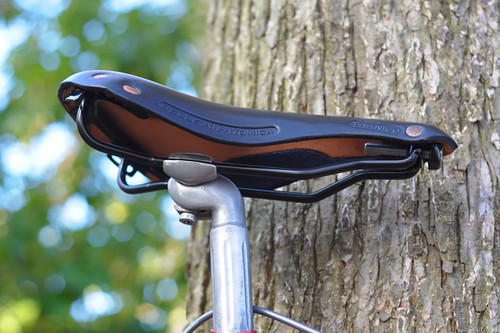
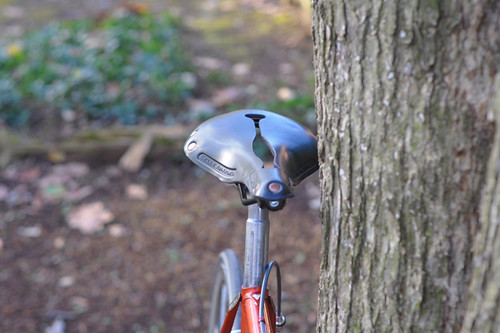
Last year I posted a review of the Selle AnAtomica Titanico saddle, just as the manufacturer was revamping their product. They have since sent me the new version of this saddle to try, and I am ready to post an update.I got the saddle in black, with copper rivets. I opted for the slotted version, to make it an equal comparison to the previous saddle I owned.
I installed the new saddle on my roadbike and used it for about 450 miles over the winter. The longest single ride I've gone on over that time has been 55 miles.
For detailed information about the manufacturer, please see my original review. But to briefly recap, Selle AnAtomica is an American producer of leather saddles,known for their classic look, their "anatomic" cut-outs, their "watershed" (waterproof) leather, and the generous adjustable range of their rails. The saddles are available in a number of colours and there are separate models for heavier and lighter riders. There is also a non-cutout version available, though the cutout is said to be a crucial feature - allowing the two sides of the saddle to move independently, relieving pressure on soft tissue.
All of these features have remained the same in the newer Selle AnAtomica models, and visually they look identical to the older ones. But there are two key differences. First, the rails are now made of cromoly steel (I take it they were made of hi-ten previously), which makes the saddles lighter. Second, the standard Titanico model is now made of the heavier duty leather that was previously used on the Clydesdale model. This was no doubt in response to complaints of the saddles sagging prematurely.
The previous SAsaddle I owned did sag over the first 200 miles, but after we tightened the tension it did not seem to be sagging again - or possibly it was, but very slowly. The newer version has shown very little, if any, sagging in the 450 miles I've ridden on it so far and has not required tension adjustment.
In my review of the older model, I described the Selle Anatomica saddle as being the most comfortable saddle I've ridden, except when it wasn't. Most of the time the slotted design worked really well, with a wonderful hammocking effect. But once in a while, seemingly spontaneously, one of the sides of the cutout slot would decide to pinch my crotch and that did not feel good at all. The SA representative thought that the stiffer leather of the new model would resolve the issue, but the same thing happened this time around. Just as with the previous saddle, there was no break-in period and it felt perfect from the start, and I mean purrrrfect - no pressure on the sitbones, no pain, just pure comfort... until suddenly, in the midst of a 40 mile ride, the right side of the slot began to dig into my female tidbits in a most unwelcome manner. I'd try to adjust my position on the saddle this way and that, but to no avail. It would pinch pretty badly, until, just as suddenly as it started, the pinching would stop and the saddle would feel perfect again. To be fair, this has happened less frequently with the new saddle than with the older model, but it still happened.
I think Selle AnAtomica is onto something with their unique design, because I cannot stress how comfortable the saddles are when the mysterious slot-pinch is not happening. The waterproof feature is also quite handy - especially for someone like me who always forgets or loses saddle covers. All of that is very cool, and I am glad that they appear to have resolved the sagging issue with the new models. Maybe the slot cutout can be optimised or customised somehow, I don't know. As it stands, I cannot trust the saddle on super-long rides in case the cut-out starts pinching again. But it is also the only saddle I can trust to be comfortable out of the box, with no break-in period. Whether the version without the cut-out resolves the pinching problem without detracting from the saddle's overallcomfort would require further experimentation.
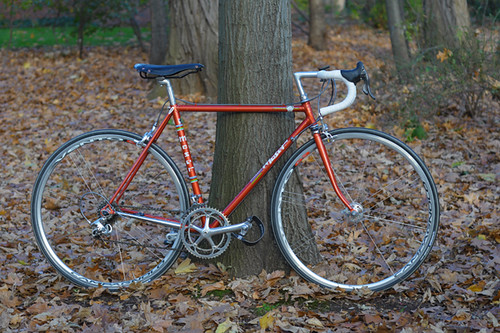
Will Spring ever arrive this year? Looking at all the new snow on the trail as we braved another "spring ride," I began to seriously doubt it. Nonetheless, my Rivendell is back in action after a long winter.
Now, here's an admission: Although the Sam Hillborne is super-comfortable, when it comes to shorter rides without major hills I've come to prefer a more pared-down roadbike. In fitting the Rivendell with a front rack, decalleur, handlebar bag and good sized saddlebag, we made a conscious decision to optimise it for long distance travel and exploration at the expense of simplicity. Though individually each accessory is fairly lightweight, all together they do add heft to the bike and make it more difficult to take in and out of the apartment. And I find it inconvenient to detach and reattach the bags depending on what kind of ride I am taking, so I would rather just leave them on.
I have a routine 30 mile ride that I do whenever weather permits, and on this ride my ideal bike would be a lightweight single speed (fixed/free flip-flop hub), with a tiny saddlebag and no fenders. Currently, my Moser and Bianchi share this role, with the Moser being the fixed gear and the Bianchi essentially acting as the freewheel singlespeed, since the 2x6 gearing is so unfinicky that it allows me to forget it's there. By contrast, the 3x8 gearing on the Rivendell feels cumbersome on a ride where I don't need to shift gears.
I am not the first person to experience the epiphany that "for fast and short rides I prefer Roadbike A, while for long and hilly rides I prefer Roadbike B." Still, I was surprised to feel myself developing this preference - particularly the single speed and no fenders part of it. There is something to be said for just being able to throw a bike down on the grass and not worry, for pedaling fast and not playing around with shifters. At times I value this simplicity and ease more than I value load capacity, gearing, comfort, and yes - even keeping my clothes clean and dry. There, I said it!
Finally, Some Clouds, originally uploaded by ParsecTraveller.
Clouds are a rarity for most of California during the summer. The climate just doesn't allow them to form...
...which is why I was excited to see a few cirrus cloud catching the light of the sunset the other day. The sky was beautiful, with much more color than usual. To all you Midwesterners and East Coasters, us Californians envy your clouds!
This little weird natural damn is called Soda Damn and is just above the town of Jemez Springs, NM. Don't know who the people in the photos are but I thank them for being good photo models.
Whilethe Randonneur collaboration bike was in my possession (it has now been shipped to its owner), for about a month I alternated between riding it and my own Rivendell in attempts to compare them.
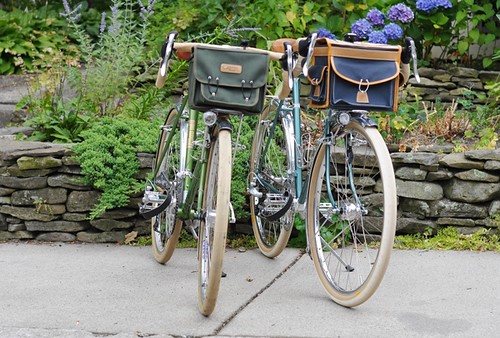
When I mention the very idea of comparing these bikes I tend to get completely polarised reactions. To some they look identical: lugged frames, 650B wheels, wide tires, fenders, dynamo lighting, dropbars and classic handlebar bags. Can there possibly be significant differences in how they ride? To others, the bicycles are so obviously different in terms of geometry and tubing, that a comparison seems equally absurd: Of course they will be radically different!
So first, let me explain the two bicycles in a way that I hope does not get too technical. The green one on the left is the Rivendell Sam Hillborne. The frame has relaxed angles, long chainstays, and classic (mid/high) trail. The tubing is oversized to support heavy loads. The top tube is unusually long for the frame size and slightly sloped, for reasons to do with Rivendell's approach to bike fit. It is fundamentally a touring bike, but with some quirky qualities thrown in.
The blueish bike is a one-off collaboration between Royal H. Cycles and myself. Built as a classic randonneuring frame, it is made using skinny, somewhat flexible tubing with fairly steep angles, moderate length chainstays, and low trail. The Randonneur is supposed to be lighter, faster and more responsive than a touring bike, yet still comfortable. The low trail geometry is considered to be optimal for carrying a front load, but overall the bike is not meant to be heavily loaded.
Fully built up with similar components, the Randonneur indeed came out lighter than the Rivendell. Unfortunately I do not have a scale to weigh them - but I estimate maybe 4-5lb (when comparing with handlebar bags attached and everything else shown here). [Edited to add: The difference between these bicycles as shown is 6lb. The Randonneur weighs 26lb and the Sam Hillborne 31lb.]
The difference in tubing is immediately apparent, both when looking at the bikes in person and when picking them up by the top tubes - I can close my hand around the Randonneur's top tube much easier. This made the Randonneur easier for me to pick up, carry around when necessary, and take in and out of the house.As for how the tubing and other differences translate into ride quality, it is difficult to say. The Randonneur is a faster bike, though modestly so. It is also less fatiguing and perhaps a wee bit cushier over bumps. I can feel the frame and fork flex as I ride, but not too much. And I would certainly not attempt to do this on the Randonneur - I think the frame might bend in half.
Regarding the low trail geometry, I have yet to organise my thoughts on that topic. Suffice to say that I expected a "weirdness" in the bicycle's handling that, for me, just wasn't there (though an acquaintance who test rode the bike disagrees). Yes, it handled differently under some conditions - but the same can be said of almost every bike in comparison to almost every other bike.
And perhaps the biggest surprise of all, was that I did not feel a significant difference in the way the two bicycles behaved with a front load. Yes, the Randonneur is spectacular at carrying weight in the handlebar bag... but then so is the Rivendell. Maybe I am not as sensitive to this specific aspect of bicycle handling as others, but I am not sure I could feel a difference. I also did not think the Randonneur was at all "unridable" without a front load, as some warned me about. Again, it is possible that I simply lack the sophistication and experience to sense the difference, but there you have it.
When I initially planned to compare the low trail Randonneur to my Rivendell, I assumed that I would prefer one type of bicycle over the other. Instead, it became clear that the two bikes are simply optimised for different types of cycling. Both are versatile in that they can be ridden on and off road equally comfortably, are fully equipped, and can carry at least some of the cyclist's belongings. The Randonneur is a somewhat faster, lighter and more "precise" ride, but it would not work in a fully loaded capacity. The Rivendell can haul great quantities of stuff unflinchingly, but at the expense of that extra bit of speed and maneuverability. The Randonneur is, of course, a custom bike with all the attention to fit and craftsmanship that implies, so I am not comparing on that level. But as far as the ride quality goes both bikes are great, just for different, albeit overlapping, uses. As for what role low trail geometry plays in all of this, I am honestly still not sure. Despite my pages of elaborate notes about the Randonneur's handling, I cannot say it is "better" or "worse" than typical mid/high trail geometry. My impressions of the handling are vivid, but oddly devoid of a value judgment. Vive la différence?
It has been a month since the last update on my scanning project, and I'm sure y'all are eagerly anticipating this update ;-) At that time I had completed scanning my personal photographs and had a good start on Mom's pictures, which netted a little over 3,800 image files in a three month time period.
The prep work for the most recent group of pictures has taken considerably longer than the actual scanning. I didn't keep track of the time, but it consumed a lot of hours. However, in the past week I've scanned another 845 family pictures! With that, the albums for my two brothers and myself are done! Done, I say! Yay! That's the good news. Bad news is that the pictures for my sister's family still need to be scanned - they are being sorted and organized by my niece. My guess is there is a couple hundred pictures yet to be scanned. Big Sigh. But the end is in sight! At least, for the pictures… genea documents are still waiting.
While sorting the family pictures I came across a bunch of photos from Phend Reunions. Those were pulled out and put with the Reunion albums. Then I organized the Phend Reunion papers from the 1960s through the present day and put them in the albums with their corresponding pictures. Scanning the papers and pictures resulted in 615 image files. (The Phend-Fisher Family Reunion Ledger which covers the early years had been scanned, transcribed, and posted to the blog in the latter part of ...)
Then, as I was rummaging through a box looking for something I came across my grandmother's genealogy "book" and realized that I had never scanned it in its entirety. Most of the pictures had been scanned at one time or another but not all of them, and not the family group sheets. The book has a "post-hole" type of binder that easily comes apart so it wasn't a problem to scan each page individually and then put it back in its proper place. The pages are just a little bit larger than legal size. Placement on the scanner was critical so that no data was lost. There were 90 pages with 116 pictures, ending up with 206 scans for that project. I went ahead and scanned all of the pictures again because I wasn't really happy with the previous scans from several years ago.
And, as reported in my 3rd update for the Genea-Blogger Games, I scanned 74 newspaper clippings on the Phend family that were in the Whitley County Historical Museum's "family clippings" files. I've since created a name index of the clippings for reference purposes.
Image files created from scanning in the past month: 1,611
845 family pictures
206 pages and pictures in Grandma's Genealogy Book
Total number of scanned image files created since mid-April: 5,434
Maude Wise Brubaker Yontz, aka "Mama" or "Grandma Bill", with her grandchildren. About 1933. From the Genealogy "Book" of my grandmother, Hazlette Brubaker Phend, which is now in my possession.
(Photo: Coming up the 5.8 pitch one of Mr. P's Wurst.)
So nice to be back home in the Gunks.
After nearly two months away, I longed for the old familiar climbing surroundings.
The overhangs.
The pitons.
The long reaches.
The horizontals.
I was climbing with Margaret on an October Sunday. She wanted some easy leading and our first target was Three Pines. Unfortunately Three Pines at 9 a.m. already had a party of three on the first pitch and another pair at the base waiting to start. This was hardly a surprise on a Sunday during peak season.
My general policy is not to wait for climbs in the Trapps. In my experience, you always find something else open if you keep looking. Sure enough, we went a little further down the cliff and found Minty (5.3) available so we were in business.
Margaret led pitch one. I think this pitch is a great introductory Gunks lead because it has an early move that seems several grades harder than the rest of the climb. This might not seem like an ideal situation for a new leader to deal with, but it happens all the time on climbs of every grade in the Gunks. You have to confront it eventually, so you might as well start to get used to it when you're leading 5.3!
On Minty, the move can catch you by surprise. You start up this little corner. A big shelf is right there for you to grab, just one step up. But the feet are these tiny, polished little half-pebbles. You have to trust your feet just long enough to step up to grab that ledge.
The move should be no big deal.
But it seems totally possible you could fall here.
So you stand there thinking "This is supposed to be 5.3! How can I be such a failure that I am worried about this little move on a 5.3??"
And you psyche yourself out.
And you try this, and you try that, desperate to avoid this tenuous little step.
Finally you just do the stupid move and feel like an idiot.
Welcome to the Gunks.
(Photo: Past the crux on pitch one of Minty (5.3).)
The other hazard on Minty is that you might go up the wrong corner. The climb keeps moving left, and all the corner systems look alike. The first time I did the route, with Liz, she went up too soon, when she should have continued moving left. But if you make this mistake, you'll likely end up on Tipsy Trees, which is another nice 5.3. So no worries.
To stay on track you should look up for the distinctive Minty tree. It is a pine tree over 100 feet up that sticks out sideways from the cliff. This tree is where pitch one ends. If you keep in mind that you are heading for this tree, you should find the correct route.
(Photo: The 5.2 pitch three of Minty.)
Minty has lots to offer. The steep, juggy climbing you'll find in the second half of pitch one and all of pitch two is especially nice. Pitch three goes at a very casual 5.2 and it isn't terribly long, but it too has good moves out from a corner system and then up jugs to the top.
My personal preference for descending from climbs in the Minty/Snooky's area is to walk a short distance to the bolted rap route at the top of the Madame G buttress. Using the bolted rap route guarantees a safe descent and avoids throwing ropes over nervous leaders on very popular climbs. The problem with this method is that the Madame G rap starts from the GT Ledge and you have to follow your nose and downclimb from the top to find the bolts. If you aren't already familiar with the location it will be hard for you to find it. In the past I have spotted the distinctive tree which grows out at an angle from the cliff right next to the rap bolts, but I must have done this at a time of year in which the trees have no leaves. Last weekend with Margaret I couldn't spot the correct tree from the top and I had some trouble finding the bolts, overshooting the right path and having to work my way back. Still, I prefer these few minutes of hunting to rapping off of the manky anchors which come and go atop the cliff.
Coming down, I could see it wasn't going to be easy to get on another three-star classic. The cliff was looking very crowded. There were parties on Madame G's, on Finger Locks or Cedar Box, on Hyjek's Horror, on almost every climb in sight. Was this a nature preserve? It bore a greater resemblance to Occupy Wall Street.
I suggested to Margaret that we do an empty climb right in front of us: Mr. P's Wurst. The climb, which ascends the right side of the Madame G buttress, is almost always open, even though it sits amidst some of the most popular routes in the Trapps.
I've been wanting to get on Mr. P's for some time, in part because I like the name, which Ivan Rezucha and Rich Perch bestowed on the route in the best Hans Kraus tradition.
Hans put up Madame G's (full name: Madame Grunnebaum's Wulst) in 1943. How many climbers understand the bawdy humor in this classic route's name? I'd wager that very few get the joke. As Susan E.B. Schwartz explains in her biography Into the Unknown: the Remarkable Life of Hans Kraus, the name was not inspired by a real person. Instead, Hans looked up at the buttress and saw two bulges up high that-- to his one-track mind-- resembled a woman's bosom. The route he created begins at a pine tree and weaves between the two breast-like features. Grunnebaum is German for green tree and wulst means bulge. Thus the route's name can be translated in full as "Mrs. Greentree's Boobs."
Once you understand the humor in Madame G's name, the meaning of Mr. P's Wurst becomes obvious. The latter route snakes up right next to Ms. Greentree's bulges, and what could be better nestled in those bulges than Mr. Perch's sausage?
Apart from the name, what interested me about Mr. P's was that no one ever seems to do it. It is always open, despite the fact that Dick Williams decided to anoint it with two stars in his 2004 guidebook. Dick also did his part to make the route more accessible, describing a new start from 50 feet up the gully to the right of the buttress instead of the 5.6 R climbing previously needed to get established on the route.
I think this new start is actually one of the reasons the crowds stay away. The gully looks unappealing and from the ground it is hard to see exactly where you're supposed to jump onto the wall.
It looked to me as though the right spot was about five or ten feet below the rap bolts that are on the other side of the gully. We decided to do pitch one of Northern Pillar (5.1) instead of climbing the gully, with Margaret leading up and cutting left near the top of the pitch to set up a belay either at or near the bolts, from which point I'd decide exactly how to get over the gully and onto the wall for Mr. P's.
Margaret ended up building a belay to the right of the bolts, in order to avoid having parties constantly rapping through as she stood there waiting for me. This worked out fine, although I think it would have been okay to use the bolts so long as she set up on the left side of them. It seems to me that when people rap and pull the ropes from above they usually fall just to the right of the bolts. So if Margaret had anchored into the bolts but stood to the left she would probably have been unaffected by the rapping parties. In the final analysis, it would have been simpler just to go up the gully.
(Photo: Approaching the crux of the 5.8 pitch one of Mr. P's Wurst. From the photo you can get some idea how overhanging the final bits of the pitch are. The other climber in the photo is on Madame G's.)
From our belay at bolt level, I traversed to the gully, downclimbed a few moves, and then made the step across to the other side. These moves are easy, but if you do it this way you need to place pro as you step down, and then again at the other side of the gully, if you want to protect your second. Again, probably it would have been better just to go up the gully.
Now I was finally on Mr. P's. The pitch wasn't difficult to follow. Good holds lead up and around the corner until you find yourself on the right side of the face of the Madame G buttress. The climbing is juggy throughout the first pitch, and the rock quality is generally good. The angle gradually steepens until it becomes overhanging for the last ten to fifteen feet of the pitch. The crux move comes at three ancient pitons. I equalized the lower two and then clipped the third one as well, hoping at least one of them would hold in the event of a fall.
A big move up to a bomber horizontal, a good cam, and another move up to a tenuous stance finished the pitch beneath a roof.
(Photo: Looking down from the hanging belay at the end of pitch one of Mr. P's Wurst (5.8). My belayer Margaret is in blue. The climber in red is descending by the bolted rappel route.)
I found the hanging belay suggested by Dick to be rather unpleasant. There are two ancient pins, plus enough horizontals to place a few cams. It isn't unsafe, but it is truly a hanging stance; I couldn't let go with both hands in order to set up my anchor. Equalizing the cordalette and tying it in a knot with one hand wasn't easy.
(Photo: Approaching the hanging belay at the end of pitch one of Mr. P's Wurst (5.8).)
Pitch two is rated 5.7+. I followed Dick's instructions exactly, moving through the roof at the break and then stepping left. The move was fun and well-protected (you can get a good cam in the break in the roof), but I thought it was a big, reachy move, definitely harder than 5.7. It reminded me of the crux moves on Maria Direct and No Glow, both 5.9.
The rest of the pitch was easier, but still good. Getting past another roof on its right side requires a couple more interesting moves, and then the route joins Madame G's to the finish.
(Photo: Just over the roof on the supposedly 5.7+ pitch two of Mr. P's Wurst.)
After I pulled up the rope and put Margaret on belay, she immediately took a fall. Then she seemed to have no trouble climbing the pitch. She told me when she arrived at the top that she'd tried the roof my way, found it ridiculously hard, and then had moved four feet or so to the left, where she found 5.7 climbing up past the roof.
So maybe Margaret's way is the right way to do it, since it is 5.7. But it isn't how Dick describes the route. Personally, I enjoyed pulling the roof, and I did exactly what Dick instructed me to do, but if you do it this way the roof move is the hardest move on the whole route, and the 5.7+ pitch becomes more like a 5.9-. So you make your own call.
I would gladly climb Mr. P's again, but I would do it differently. I would just go straight up the gully rather than deal with the bolted rappel freeway and the downclimb/traverse. And I think I would bring a few extra cams and runners and do it in one pitch all the way from the ground to the finish on the GT Ledge. This would avoid the unpleasant hanging belay. And then you'd get one super long pitch of juggy steep climbing, wholly in keeping with other great climbs on the same buttress, like Columbia (5.8) and Madame G's (5.6).
If you do it this way I'm sure you too will end up a friend to Mr. P.
I do havesome additional long term ski boot reviews in the pipeline but here is aninterestingobservation from this week that kinda surprised me. Although I have both boots in the closet and have skied the ONE a bunch the thought never occurred to me to make a comparison.
Big Steve and Marshal over at TGRwere the first I saw to bring up the likely comparison. Took me a week to have that AHA moment. One of the reasons TGR is a good place to hang.
A better comparison maybe? And a good place to start for a franken-boot project for those inclined and wanting to save some money? Likely!
A better comparison now with the current boots available instead of the TLT5 and 6 IMO is the TLT6 and the ONE PF-TX. Just 5.5oz/156g between the two boots, and either $100 or $300 less in cash. $650 retail for the One PF-TX (but seemingly easy to be had for $550 online) compared to new TLT6 Mtn @ $750 or the P @ $950.
The ONE is a lot more real ski boot than the 5.5 ounce weight gain would appear to be over the TLT Mountain.
It has been gnawing at me for a week or so. I seem to remember Lou over at Wild Snow or one of his members "asking" for a TLT ONE at some point in the recent past. Without a doubt imo that is exactly want the TLT6 is now.
Not sure what the weight is of the third buckle @ the toe andthe two added Pbax straps are for the ONE. The liners are off by one ounce. Add the spoiler, bigger power strap, added weight of the deeper tread and heavier lugs of the sole rubberand extra sole length of the ONE and the grams and then ounces add up quickly.
Performance wise I don't see a huge difference in either boot, except for skinning. There the advantage of a shorter sole/backed up tech fitting and more/easier ROM will help but also easier to go down a shell size in the ONE. (which Lou already thinks he can do in the TLT6) And ROM can be added easily enough or loosened up any way. I take a 29 TLT and use every bit of the length. Ieasily wear/ski a 28 ONE. And save3mm smaller BSL. Guess I'll also need to look into a 28 TLT myself. The tech fitting placement in the toe between th TLT and the ONE is the one of the few places I don't see a way to fudge the performance.
Sometimes it is easier to just ignore the obvious in front of your eyes. As I have clunked around in my TLT6s here at the house sorting out my liner fit I kept having the nagging feeling I was in just another ski boot. My most recent "ski boots" are the ONE and the RS. And now that feeling makes more sense to me. Taking a closer look at the TLT6 and the ONE side by side and looking down at either while they are on your feet and the resemblance is uncanny. Looks to me like Dynafit shot themselves in the foot here.
More details to come asap. But anyone doubt how easy it would be to chop 200+ grams off a ONE or Mercury shell and get under the factory TLT6 shell weight and equal or better the skiing of a TLT6?
I just so happened to read about this place on another FOTR's blog. I'm so glad I did because this was one of the most interesting places we have visited so far! Boone Hall is a working plantation and is the oldest continuous working plantation in the US.
We took a tour of the lower level of the "big house". The owners still use the upper levels of the house. The house was built in 1936. It is listed on the National Register of Historic Places. The tour guide was dressed in costume and was very friendly and interesting. The TV series North and South with Patrick Swayze was filed here. The movies Queen with Halle Berry and The Notebook were filmed here also.
The next thing you can visit is the row of slave cabins. They date back to 1790-1810 and are mostly in their original state. These were only some of the slave houses and would have been the workers that held more important positions. The houses were built with bricks that were made here and were evidence of the slaves' skills. Some of the bricks still have the handprints from their makers.
As you move through the cabins, each one represents one aspect of the slaves' lives. There are audio presentations to share the information.
Some of the crafts were on display. On top of that, a woman was there making some of the sweetgrass baskets.
The grounds are just gorgeous with gardens and trees everywhere.
We took an open air coach ride to see the fields that are still in operation.
Our favorite thing by far was learning about the Gullah culture. We first heard the word "Gullah" when we listened to the audiobook "The Mermaid Chair" together. We were honored to sit and listen to Carolyn "Jabulile" White, who grew up on the sea islands.
"Jabulile" has travelled to South Africa with the Presbyterian Peacemaking Program Travel Study Seminar for PEace. While there she was given the Zulu name "Jabulile" meaning Happiness and this is what she hopes to pass on thru her stories.
She learned the art of Gullah storytelling from her parents and grand parents. "Jabulile" thought it is only natural that she should sheare these stories with the people in her community, especially the children. She speaks fluent Gullah when telling her stories using Island-dialect just as she heard them on the Island as a child. She tells her stories with the same humor of the old stories told on the Plantations.
If you are in the area, I highly recommend visiting this place. Very interesting history here and it's done in a way that truly makes it come alive!
(In the photo: climber reaching the optional hanging belay point at the end of pitch two of Madame Grunnebaum's Wulst)
You don't see too many blog posts about 5.6 climbs.
What kind of climbing blogger admits to being excited about 5.6?
Well, 5.6 is the first GREAT grade at the Gunks. There are many 5.6 climbs to get excited about. I would argue that 5.6 is one of the premier grades at the Gunks. There are more world-class Gunks 5.6's than 5.7's. And although 5.8 is also a great grade at the Gunks you could easily make the case that 5.6 is even better.
So here are some of my favorites, and these are not just climbs that top out at 5.6, but also a few 5.6 pitches that you'll find on some harder climbs. I am not writing guidebook entries here, so I do not intend to help you find the climbs or describe every single detail. Rather, I hope to explain to you why you should like them as much as I do.
THE BIG THREE
Any discussion of 5.6 at the Gunks has to contend with the three consensus bests. People travel long distances to the Gunks just to tackle these classics. They are so well-known, I probably don't even have to name them. They are High Exposure, Shockley's Ceiling, and Madame Grunnebaum's Wulst (popularly known as Madame G's). I'm not about to tell you that these beloved classics stink. But I do have some opinions about them that may buck the conventional wisdom just a bit.
High Exposure
High E is extremely popular. Every time I am nearby I find it occupied. I frequently see newcomers fumbling about trying to locate the start of the climb, clearly on a mission that depends wholly on climbing this one route. A couple weeks ago, when we had a brief spell of perfect June weather, I took a day off from work and visited the Gunks on a weekday. My partner and I had our pick of routes. Very few climbers were about and no one was waiting for anything. But High E? When we walked by it had two parties at the base lined up to climb it.
In order to climb High E you have to be prepared to wait for it. Is it worth the wait?
I would say it is, but I also think it can't possibly live up to the hype. It is overrated. The first 5.4 pitch from the ground to the GT ledge is perfectly pleasant but totally unremarkable. The second pitch has the big move out onto the face, which is not physically challenging. There is a great vertical crack for a sidepull and bombproof gear; you just have to lean out (this is the mental crux) so you can look up and locate the jugs above. This mental crux is the moment that makes the climb's reputation, and it is very good. The rest of the pitch consists of about 40 feet of moderately overhanging jug pulling. It is a nice pitch, and it is in my opinion a great early 5.6 lead despite the "+" in the official rating, since the juggy climbing resembles gym climbing, and the pro is abundant. There's a good horizontal for a cam wherever you want one. But it isn't my choice for best 5.6 in the Gunks.
Shockley's Ceiling
In contrast, Shockley's does live up to the hype. At least the third crux pitch does. The first two pitches are easy throwaways. But the last pitch, which ascends through the improbable ceiling, then moves up a left facing corner to another crux at a small overhang, is worth all the accolades. This is another 5.6 that, despite appearances, is a great climb for newish 5.6 leaders, since there are three pins right below the crux crack, and you can put a perfect #2 Camalot into that crack and feel completely secure that if you blow the ceiling you won't be falling far. Once you're past the ceiling, you can bask in the glow of your accomplishment while you cruise up to the second crux, and then you have to focus again (think layback) to finish it off. This final pitch alone makes Shockley's Ceiling a worthwhile adventure but you can make it even better. If you do Strictly From Nowhere (5.7) up to the chains for your first pitch, then diagonal up right for an easy, short second pitch to the belay below the ceiling, and then finish on Shockley's, you've done one of the very best moderate climbs at the Gunks, regardless of grade.
Madame G's
Madame G's is, in my opinion, the best overall 5.6 at the Gunks. The first pitch is easy (5.4) and short; it really isn't the attraction, and if you're up to leading 5.8, the first pitch of Columbia just to the left is a wonderful way to get up to the ledge where the real business of Madame G's starts. And once the business starts, you'll find you're in for a real treat. Pitches two and three are both relentlessly steep, with great holds. I like to combine these two pitches and ignore the hanging belay in the middle, but beware of drag on this wandering route. The pumpiness increases as you get towards the top and you do not want to have to struggle to pull up your rope as you get close to the anchors. So long as you watch the drag, this route is a joy the whole way; I call it the best because it offers such consistent high-quality steep climbing.
THE OTHER BESTS
Maria
Beyond the three "bests" are many other highly rated 5.6 routes, and some that should be more highly rated than they are. Maria is a route that gets three stars in Dick Williams' latest guidebook, but I think the initial traverse pitch is underrated, and the third pitch is often ignored by climbers unaware of its true location or even of its existence. (The most recent guidebook to the Gunks places this third pitch in the wrong location, on a "mud slope" to the left of the real route.) If you do the whole route I think Maria rivals Madame G's for the title of best overall 5.6. It certainly outshines Madame G's in its variety.
The first pitch climbs the best part of Frog's Head (5.6-), going up a thin vertical crack that takes nuts like a dream. Pull the crux move past a bulge (great fun), then take the no-worries traverse to the right with great gear to the corner. Pitch 2 heads straight up the corner to the GT ledge. This pitch is rated 5.6+ and it is also consistent fun. There is no cruxy moment, but you may at times have to think a little and use opposition to move upward. Finally, from the top of pitch 2, move right until you are below a right-facing corner capped by a roof about 20 feet up. This roof problem, also rated 5.6+, is a wonderful sandbag. I don't think this is a pitch for the new 5.6 leader; it is short but not easy. There is a good crack for gear in the roof but it is thin and in my experience makes the small cams placed there hard to evaluate. You also move left out the roof and a fall might be a little ugly even if the gear is good. There is no denying, however, that the climbing here is excellent.
Put it all together and you get crack, bulge, traverse, corner, and roof climbing, all in one route, and all at 5.6. Pretty amazing.
Baby
Baby is another of my favorite 5.6s. it gets two stars from Williams but I would argue for three. It has two excellent pitches, the first with a short off-width that seems to freak people out, and the second ascending a nice corner to a cool 5.6 roof. With regard to the off-width: I don't intend to help you climb it. There are several different ways to solve it. But I will give you one bit of advice. Bring a big cam. A #5 Camalot is good; I know this from experience. A #6 would probably be even better. With a big cam you can protect the off-width a few crucial feet higher than you could with a #3 Camalot. And then you'll be set.
Moonlight
Moonlight gets only one star from Williams. I would argue for at least two. It is another great climb, with a mental crux that in my opinion requires a much bigger gut check than the move on High E. Pitch one is a pleasant, long climb up a prominent corner to the GT Ledge. Pitch two climbs an easy ramp-like feature until you find yourself in a corner with a roof over your head. To escape from the corner, you must commit to the overhanging left wall, on tiny feet, and pull yourself around to the left, all the while hoping you'll find some holds over there once you escape the roof around the outside corner and onto the main wall. Oh, and you have to make this move with just a piton for pro. When I did it, I also managed to work a shallow nut into a seam, but I wasn't fooling myself; the nut was junk.
Once you commit to heading around the corner and you get a good stance, the pitch isn't over. There's still good climbing up a crack to the finish. A very exciting pitch for the grade.
GREAT 5.6 PITCHES IN HARDER CLIMBS
Bloody Mary
This climb has a great face-climbing first pitch that used to be rated 5.6. (Williams now rates it 5.7.) But the second pitch is still considered 5.6 and there is no other 5.6 like it. It involves climbing up to the left end of an overhang and traversing about 10 feet in a VERY overhanging position to the right, until it is possible to head upward on good holds. Then it's an easy romp to the GT Ledge. This pitch is one of the few that is easier for short people. It is strenuous, but the holds and pro are great. Skip pitch 3, it stinks.
Bold-ville
I would guess that most people do the excellent 5.8 first pitch of Bold-ville and then set up the chain anchor above all the harder Seasons climbs, skipping the fun second pitch of Bold-ville. This is a shame. Somewhat similarly to Bloody Mary, the 5.6 second pitch of Bold-ville involves a steep hand traverse around a corner, this time in the opposite direction, to the left. The horizontal crack/shelf you follow provides good hands and pro the whole way.
Directissima
Another way to get to the GT ledge on the High E Buttress, Directissima is a climb of great variety and another good candidate for best moderate climb in the Gunks. Partially this is because of the fun 5.8 crack on pitch one and the scary, pumpy 5.9 traverse on pitch two, but mostly it is because of the unique beauty of the 5.6 third pitch, which follows the point of the arete all the way to the GT Ledge. The pitch starts out steep, but as you climb the angle eases off and soon you are free to just take in the surroundings from your perch at the tip of a triangle sticking out from the main cliff of the Trapps, with terrific views in both directions. And once you reach the GT Ledge you get to finish it off with the crux pitch of High E.
Basking Ridge
This climb is listed in the most recent Williams guide to the Nears as a link-up of two old classic climbs, Baskerville Terrace and Yellow Ridge. The first pitch, which is the first pitch of Baskerville Terrace, is a great, pretty stiff 5.7. The 5.6 second pitch goes to the right on a ledge about 10 feet below a pair of pitons that make up an optional belay station on Baskerville Terrace. Follow this ledge to the right into a left-facing corner, and then a perfect, rising hand- and foot-rail will take you to the right to the outside corner and around to a stance. This rising traverse takes good gear and features great exposure, and when you're at the stance around the outside corner you just head straight up through the awesome 5.6 roofs on the final pitch of Yellow Ridge. A great and unique 5.6 pitch in the Nears, and one of my favorites in the Gunks.
It is kind of a blustery (but mild!) day today, with some falling (but mostly blowing) snow. The blustery nature of the day has me thinking back to a few days ago when the day was absolutely calm and quiet. The photo you see here was made on this quiet day, with barely a sound to be heard along the shoreline. When this cloud drifted over the ridge of ice plates I knew I had to photograph it. The complementing blues of the ice and sky were beautiful. I sure hope we get a day like this on wednesday of next week, if we do it will be a perfect day for our wedding ceremony!
In addition to the Yarians, Ruperts, and Switzers I have Berlin, Coy and Hoffman ancestors who lived in Columbiana County, Ohio. All of them in the 1803-1860 time period and all in the northeastern tier of townships: Unity, Fairfield, and Salem, and Green (which would become part of Mahoning County when it was formed in 1846).
By the beginning of my second week in Salt Lake City, I had pretty much gotten through my original, rather short, “to do” list except for one item that I knew would consume a huge amount of time. It simply said “Land Records – Columbiana County.” I've had good luck before with land records naming heirs of an ancestor and was hoping for some more luck, especially in the Rupert and Switzer lines.
If you have never done any work with deed records, be forewarned that it can be tedious and confusing. But it can also be extremely rewarding. First you have to search for the desired name in the General Index to Deeds. There are generally separate books for those purchasing land (grantee) and those selling land (grantor). The index will provide the name of the grantor and grantee, the date the transaction was recorded (could be just the year, and the recorded date could be many years after the date of the transaction), the location of the land (in the case of Ohio it is by Range, Township, and Section), the type of deed, and the volume and page number of the deed book in which the transaction is recorded.
This nice tutorial Taking The Mystery Out of Land Records is helpful as a reminder or as an introduction to working with deeds as is this list of Terms used by the Register of Deeds. (There are many others “out there” on the internet, these are two that I've used in the past.)
There were four rolls of microfilm with the grantee index and five rolls with the grantor index covering the years 1798-1897. It would take nearly two full days, but I transcribed each entry in the index books for my known or presumed ancestors John D. Berlin, Henry Coy, Detrick Hoffman, John Hoffman, John Rupert, Jacob Switzer, and Conrad Yarian along with a few entries for others with the surname Rupert and Switzer..
The first day I made it through the grantee index, writing them out by hand. Then, that night back at the campground I typed each entry into a spreadsheet. Duh! Duplicate work. The next day I arranged the netbook so I could type directly into the spreadsheet. A little awkward, but it worked quite well.
After getting the entries from the grantor index entered I sorted the spreadsheet several different ways to review the data. One was attempting to match up the sale of a piece of land to its corresponding purchase, another sort was by township, and yet another by surname.
All of that was done so that I could determine which deeds should actually be looked at. There were too many of them to review them all. Top priority was given to those that were sold by “so and so, etal” (etal means “and others” which could indicate a sale by heirs of the owner of the land) and to those that were sold with a “Quit Claim” deed (sometimes indicating a sale to another family member). I then went to the Library Catalog to get the film numbers and added that information to the spreadsheet.
A small portion of my list of deeds.
I actually looked at about 1/3 of the entries on my list. I had highlighted the records that I really wanted to look at and had sorted the list by film number so I could see what else was on the same roll of microfilm. Even then, I didn't always look at everything from my list on the same roll of film – sometimes I got distracted by what I found in certain deeds and went off on another tangent looking for something else! That's the beauty of being at The Library where a wide variety of sources are available.
As I looked at the deed records I abstracted information from those that were “of interest” to me, adding that information to the spreadsheet. Some documents were scanned while others were just abstracted. There simply wasn't enough time (or even a need) to scan them all.
The spreadsheet with data added after reviewing the deed.
Was it worth the time it took to make that extensive list of land transactions? Yes, indeed! (Pun intended.) It was definitely worth it. What I found in those deed books was cause for more than one Happy Dance and in future posts, I'll summarize a few of the things I found and the discoveries which followed.
We have been busy, busy, busy since we hit the valley. Between seeing Austin and the rest of the family, we've hardly had time to catch our breath. We spent the night at Memaw's, and Ava decided that Memaw is the bomb....just like Austin thinks she is. On Sunday, the guys took the kids and they went up on the mountain and went skeet shooting. The ladies all went to see the movie The Help. Nathan and I had already seen the movie, but I loved it so much that I was happy to see it again.
We have a very short visit, due to the holiday weekend coming in (we can't stay at this place then). So we are trying to enjoy what little time we do have. The valley is as beautiful as always. Beyond our heavy hearts over the devastation in OBX, we are trying to enjoy where we are.
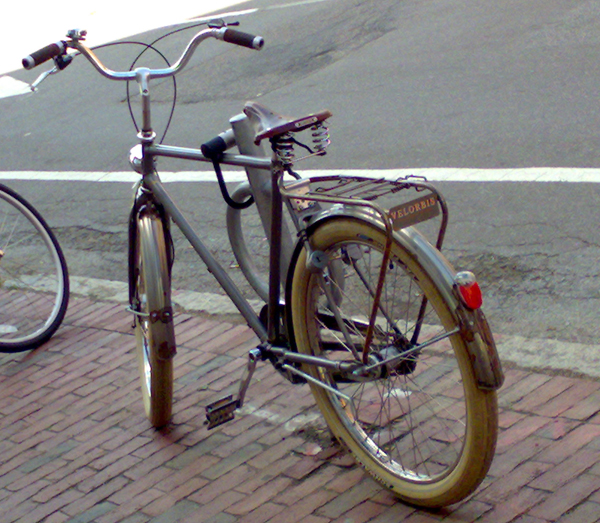
My thoughtful Co-Habitant has sent me some photos of lovely bicycles that he took while I've been away:
Velorbis Scrap Deluxe, spotted in the wild in Cambridge, Mass.! This bicycle is absolutely gorgeous, and I especially love the pairing of the silver frame with the cream tires and the warm brown leather of the saddle and grips. I like a bicycle that will look good when dirty. This one looks great dirty! One question however: Is that rust on the fenders and rack?.. Edited to add: a reader forwarded me an email with the following message from Velorbis: "The bicycle in question is a Scrap Deluxe limited edition we made in 2007 WITHOUT any rust protection nor powder coating hence the name scrap deluxe. It was an intentional design and it was meant to rust to give it a 'scrap' look. We quickly realized that people didn’t get it and we quickly reverted to rust protection and powder coating of all our models in 2007 so today you will not have any issues with rust on your bicycle from Velorbis." Hope this response on their part is helpful to those wondering about rust. Here we have a Biria Classic, parked in Harvard Square. A very stylish bicycle that can be had for a fraction of the price of imported Dutch bikes.
And the same Biria Classic, only in red, for sale at Cambridge Bicycles. The price tag says $450. Next to the Biria is an orange Batavus transport bike. Very cool, and I bet that stands out in traffic!
And what do we have here? Yes, it's is the Rivendell Betty Foy, casually displayed at Harris Cyclery. Each Betty Foy is finished according to customer specification, and it is interesting to see the differences between the floor model at Harris and Dottie's beloved Betty at Let's Go Ride a Bike. I like Ms. Foy best when she is fitted with fenders, a rear rack, and brown leather saddle and grips -- but I absolutely love the red brake cables that Harris put on her; they are the perfect touch!
And finally, here is my Co-Habitant's Pashley Roadster again, in the glorious greenery of Boston Commons!
 Will Spring ever arrive this year? Looking at all the new snow on the trail as we braved another "spring ride," I began to seriously doubt it. Nonetheless, my Rivendell is back in action after a long winter.
 Now, here's an admission: Although the Sam Hillborne is super-comfortable, when it comes to shorter rides without major hills I've come to prefer a more pared-down roadbike. In fitting the Rivendell with a front rack, decalleur, handlebar bag and good sized saddlebag, we made a conscious decision to optimise it for long distance travel and exploration at the expense of simplicity. Though individually each accessory is fairly lightweight, all together they do add heft to the bike and make it more difficult to take in and out of the apartment. And I find it inconvenient to detach and reattach the bags depending on what kind of ride I am taking, so I would rather just leave them on.
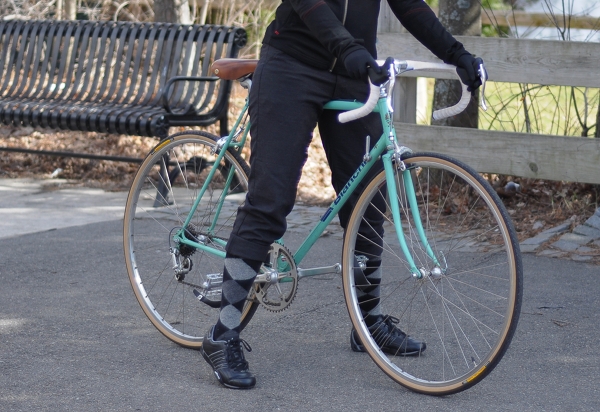 I have a routine 30 mile ride that I do whenever weather permits, and on this ride my ideal bike would be a lightweight single speed (fixed/free flip-flop hub), with a tiny saddlebag and no fenders. Currently, my Moser and Bianchi share this role, with the Moser being the fixed gear and the Bianchi essentially acting as the freewheel singlespeed, since the 2x6 gearing is so unfinicky that it allows me to forget it's there. By contrast, the 3x8 gearing on the Rivendell feels cumbersome on a ride where I don't need to shift gears.
 I am not the first person to experience the epiphany that "for fast and short rides I prefer Roadbike A, while for long and hilly rides I prefer Roadbike B." Still, I was surprised to feel myself developing this preference - particularly the single speed and no fenders part of it. There is something to be said for just being able to throw a bike down on the grass and not worry, for pedaling fast and not playing around with shifters. At times I value this simplicity and ease more than I value load capacity, gearing, comfort, and yes - even keeping my clothes clean and dry. There, I said it!


 Whilethe Randonneur collaboration bike was in my possession (it has now been shipped to its owner), for about a month I alternated between riding it and my own Rivendell in attempts to compare them.
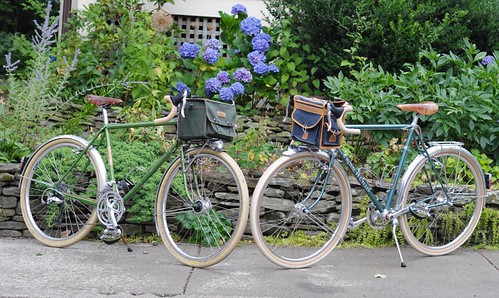 So first, let me explain the two bicycles in a way that I hope does not get too technical. The green one on the left is the Rivendell Sam Hillborne. The frame has relaxed angles, long chainstays, and classic (mid/high) trail. The tubing is oversized to support heavy loads. The top tube is unusually long for the frame size and slightly sloped, for reasons to do with Rivendell's approach to bike fit. It is fundamentally a touring bike, but with some quirky qualities thrown in.
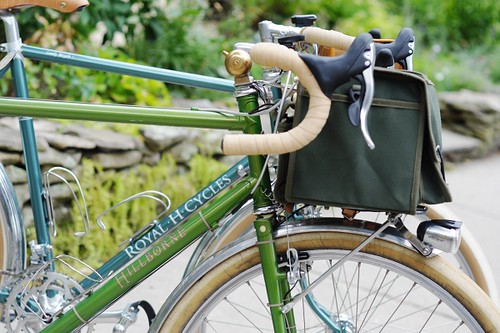 Fully built up with similar components, the Randonneur indeed came out lighter than the Rivendell. Unfortunately I do not have a scale to weigh them - but I estimate maybe 4-5lb (when comparing with handlebar bags attached and everything else shown here).
 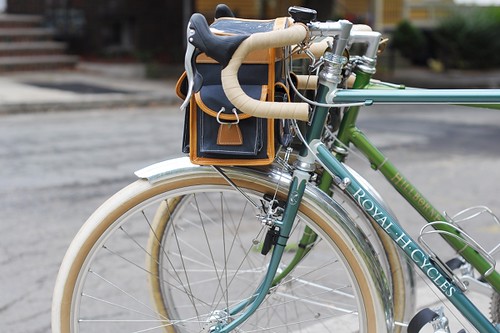 Regarding the low trail geometry, I have yet to organise my thoughts on that topic. Suffice to say that I expected a "weirdness" in the bicycle's handling that, for me, just wasn't there (though an acquaintance who test rode the bike disagrees). Yes, it handled differently under some conditions - but the same can be said of almost every bike in comparison to almost every other bike.
 And perhaps the biggest surprise of all, was that I did not feel a significant difference in the way the two bicycles behaved with a front load. Yes, the Randonneur is spectacular at carrying weight in the handlebar bag... but then so is the Rivendell. Maybe I am not as sensitive to this specific aspect of bicycle handling as others, but I am not sure I could feel a difference. I also did not think the Randonneur was at all "unridable" without a front load, as some warned me about. Again, it is possible that I simply lack the sophistication and experience to sense the difference, but there you have it.
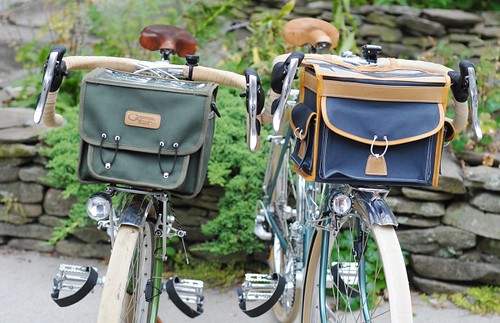 When I initially planned to compare the low trail Randonneur to my Rivendell, I assumed that I would prefer one type of bicycle over the other. Instead, it became clear that the two bikes are simply optimised for different types of cycling. Both are versatile in that they can be ridden on and off road equally comfortably, are fully equipped, and can carry at least some of the cyclist's belongings. The Randonneur is a somewhat faster, lighter and more "precise" ride, but it would not work in a fully loaded capacity. The Rivendell can haul great quantities of stuff unflinchingly, but at the expense of that extra bit of speed and maneuverability. The Randonneur is, of course, a custom bike with all the attention to fit and craftsmanship that implies, so I am not comparing on that level. But as far as the ride quality goes both bikes are great, just for different, albeit overlapping, uses. As for what role low trail geometry plays in all of this, I am honestly still not sure. Despite my pages of elaborate notes about the Randonneur's handling, I cannot say it is "better" or "worse" than typical mid/high trail geometry. My impressions of the handling are vivid, but oddly devoid of a value judgment. Vive la différence?
 Maude Wise Brubaker Yontz, aka "Mama" or "Grandma Bill", with her grandchildren. About 1933. From the Genealogy "Book" of my grandmother, Hazlette Brubaker Phend, which is now in my possession.


 We took a tour of the lower level of the "big house". The owners still use the upper levels of the house. The house was built in 1936. It is listed on the National Register of Historic Places. The tour guide was dressed in costume and was very friendly and interesting. The TV series North and South with Patrick Swayze was filed here. The movies Queen with Halle Berry and The Notebook were filmed here also.
 The next thing you can visit is the row of slave cabins. They date back to 1790-1810 and are mostly in their original state. These were only some of the slave houses and would have been the workers that held more important positions. The houses were built with bricks that were made here and were evidence of the slaves' skills. Some of the bricks still have the handprints from their makers.
 Some of the crafts were on display. On top of that, a woman was there making some of the sweetgrass baskets.
 We took an open air coach ride to see the fields that are still in operation.
 Our favorite thing by far was learning about the Gullah culture. We first heard the word "Gullah" when we listened to the audiobook "The Mermaid Chair" together. We were honored to sit and listen to Carolyn "Jabulile" White, who grew up on the sea islands.


 12:25 pm (Alaska Time) April 5, ..
 Velorbis Scrap Deluxe, spotted in the wild in Cambridge, Mass.! This bicycle is absolutely gorgeous, and I especially love the pairing of the silver frame with the cream tires and the warm brown leather of the saddle and grips. I like a bicycle that will look good when dirty. This one looks
 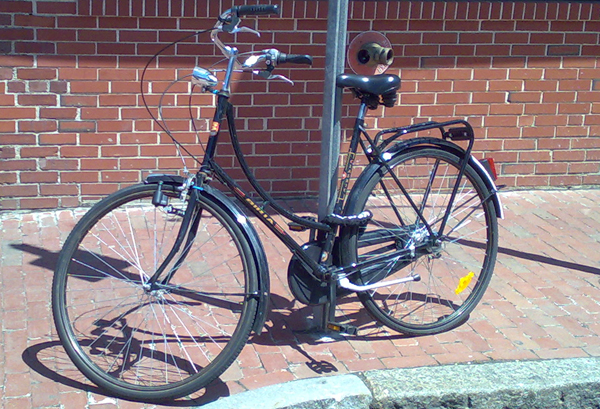 Here we have a Biria Classic, parked in Harvard Square. A very stylish bicycle that can be had for a fraction of the price of imported Dutch bikes.
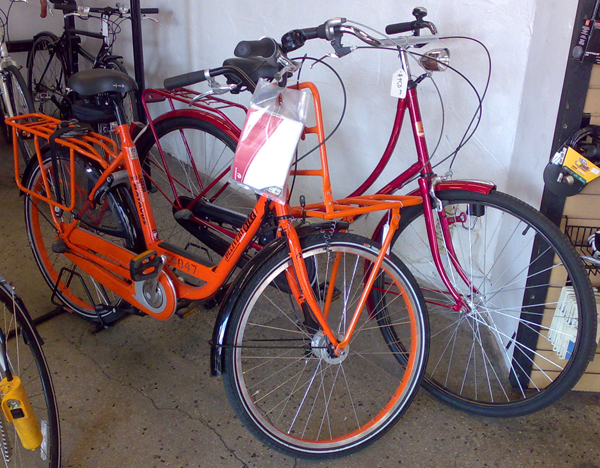 And the same Biria Classic, only in red, for sale at Cambridge Bicycles. The price tag says $450. Next to the Biria is an orange Batavus transport bike. Very cool, and I bet that stands out in traffic!
 And what do we have here? Yes, it's is the Rivendell Betty Foy, casually displayed at Harris Cyclery. Each Betty Foy is finished according to customer specification, and it is interesting to see the differences between the floor model at Harris and Dottie's beloved Betty at Let's Go Ride a Bike. I like Ms. Foy best when she is fitted with fenders, a rear rack, and brown leather saddle and grips -- but I absolutely love the red brake cables that Harris put on her; they are the perfect touch!
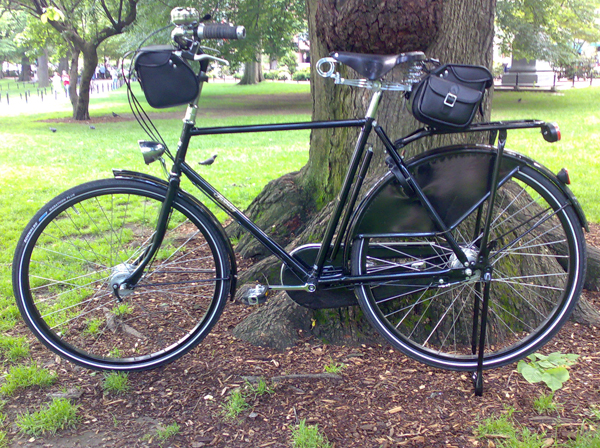 And finally, here is my Co-Habitant's Pashley Roadster again, in the glorious greenery of Boston Commons!