Day 1:
In the car we eventually decided to hit Shannon Falls on the first day. We figured trying to get on busy apron climbs on a Saturday late in the morning was not going to benefit us in our time use equation and opted for Shannon Falls. After a quick stop to set up camp (the last tent site!) we got rolling south to Shannon Falls.
Our objective there was the new route Skywalker. A mellow 5.8 multi pitch route that would be good for us to do as our intro to the weekend. We hiked quickly up to the base to get in the queue. There was a second leaving the ground, and a party of two ahead of us. We geared up while we waited. Three parties of two arrived shortly afterward. This is a very popular climb.
Finally it was our turn, and I waited for the party ahead of us to get to the belay before I started out. The first moves were a touch tricky with a seeping corner where I wanted to place a foot. Eventually I succumbed to putting a foot in the wet corner to make the crux move of the pitch and continue up. There was then a move leaving the crack to traverse the slab to where the crack continues and up I went to a tree belay. (The party ahead of us was currently occupying both bolted anchors. ) I brought Sabrina up in time for her to head up the next pitch behind their second.
 The next pitch was a 5.8 corner that was a little compressed, but offered great climbing and good pro opportunities. I found it a little rough on my right foot as I continuously wedged it into the corner/crack. But it was a nice pitch. I got the next pitch which followed some cracks up to a heady move right before the next belay. Gear was good until that point, but sort of disappeared in the last ten feet or so. I made the moves and brought Sabrina up.
 The next pitch(4) is where the route gets its name. It is the Skywalker Traverse. One of the bolts at the belay actually says "May the Force be with You." It is a really easy, somewhat exposed traverse. It is slabby and can be done with counter pressure with hands in the crack at the base of the wall above it, but I walked it for the most part with my hand on the wall.
The final pitch was a short easy bolted slab that I ran up and brought Sabrina to the top. This route was an excellent warm up for us, and a pretty nice route for the grade.
 We walked off and headed to the Klahanie Crack area. There was of course a line for that route as well and we waited for a couple to get off of Dirty Dickie before we attempted to climb it. Sabrina led it and I followed, finding the wide section near the top to be the crux. We rapped, and then Klahanie Crack was available. Sabrina racked up for it, and headed off on the sharp end. She was placing a lot of gear due to it being late in the day and her energy level. This caused concern about having enough gear to finish the pitch. Her feet were sore from jamming the crack and she hung a few times to cool them off. Once at the top she brought me up and we rapped. With our feet worn out, we did not even bother with Cardu Crack. Maybe next time. A cool soak of our feet in Shannon Creek did the trick before we returned to our camp site.
Day 2:
We had big ambitions of climbing a new route, the North Face variation of Squamish Buttress, aka Squamish Buttface. Our approach climb was to be Snake on the apron. Definitely not the fastest way up to the South Gully, but one we thought capable of doing. The alarm went off at 5am and we both felt a little tired from the previous day to wake up at that point. So we slept in until about 6am. It was at least a few more hours before we were able to leave the campground and walk to the base of the route.
Even though the first pitch is 5th class, it appears the guide book either wants you to scramble the pitch, or simply does not count it in the pitch total. We roped up for it and ended up climbing two short pitches to reach the ledge where Snake starts. Since I led the approach pitches, Sabrina took the lead on the first pitch, which starts the right facing corner climbing. Before she left, we discussed if she would do the unprotected 5.7 traverse or head up to the tree leaving me to the traverse. She told me she might, but would probably end up at the tree. Which is where
 she ended the pitch and brought me up to. I led out for the 5.7 traverse, and was not happy with the lack of protection. I was able to sling a horn, but botching the moves on the traverse would have led to a decent pendulum. I balked numerous times attempting the traverse high until I somehow noticed a really good foot hold low and down climbed a few moves to make the traverse from there. Once on the low path, I made quick work of the traverse and was at the bolts on the other side, bringing Sabrina in.
The next pitch was lightly protected 5.9 traverse, so I got that one too. It started out on easy ledges and ramps to a good sized ledge with a not so good sized bush. There are two variations that follow: one that continues left on a unprotected slabby traverse of a dyke, or another that heads up a slab with a 2" corner moving left once you gain some ledges. Both options were 5.9. I placed a cam at my feet and went left. There was a large hand pocket about two thirds of the way, but I couldn't reach it and came back. I looked up. It appeared promising. There was a small pocket in the corner where I got at least three lobes of a blue alien. I was going up. By placing the cam I negated the first hand hold on that section but made do with what I got until I got the second hand hold and kept it until I could reach the ledges above. On safer ground, I slung a horn and headed to the belay tree. I brought Sabrina up as she thanked me for leading the sketchy slab.
Sabrina got the next pitch and headed up the long right facing corner. There was a steeper section early on, but the crux came close to the next bolted anchor. I quickly followed as Daryl and Luke from the previous day were now on our tails. I offered them to pass at the next belay, but Daryl was only about a quarter up the pitch when I arrived at Sabrina's location. So I quickly headed out thinking we could stay ahead of them. This was proving true as I dispatched the first half of the pitch quickly. There were few pro opportunities, which kept me moving quickly. The lay backing of the corner was a touch strenuous, and moving kept it more manageable. Then I came up on the crux. There were some thin moves up a flake before gaining a ledge at the base of a large wall. A traverse back right overcomes the wall, but not without going through the crux first.
 I got to the ledge and slung some roots. Moving further, I removed the sling and placed it on the tree in the middle of the traverse. For some reason I had my feet really high and they were getting tired. I placed a cam in a pocket a few feet from the tree. I tried to move right, but couldn't figure out the moves. My feet were getting tired. I hung. My foot slipped while hanging. There was a patch of slick damp rock from a seep and my foot must have got in it. I dried it a bit. I attempted again. No luck, I was hanging again. But this time I dropped my feet. All I have to do is climb it like a slab, and not rely on my hands so much I thought. I tried again. But it still couldn't make the move. Then I finally shortened the draw on the cam and was able to make the move and zip around the corner to the next belay. I brought Sabrina up and she quickly moved on to the final 5.7 pitch and then we scrambled up to Broadway for a lunch.
During our lunch break we discussed our slowness and tiredness. We also discussed which route we should take to reach Squamish Buttress. There were four people lined up at Memorial Crack and we had moved slow to this point. It was later in the day than we wanted, and I offered a suggestion to Sabrina that we head down and perhaps try another route on the apron and shoot for Squamish Buttress the following day. On the way down we were once again fairly slow and chatted a bit with other Seattle climbers on the trail. We then chatted a bit with Luke and Daryl before heading down. It was now 4:30pm and I recommended to Sabrina we call it a day.
Day 3:
We awoke tired again, but we were motivated and got out of the tent quicker and started our day. We left the campground at least an hour earlier than the previous day and hoped to do Diedre as our apron route. Upon arriving at Diedre, there was one party climbing and another waiting. We opted to take Banana Peel to the top as it also would deposit us at the base of Boomstick Crack. Sabrina led up to the crack and started the traverse. When the rope ran out, I simul climbed until I reached her at the base of the first real pitch. She led again which gave me the crux pitch of the route. I almost passed the bolt on the way to a .10b bolt before Sabrina caught me and directed me in the right path. I went through the crux moves, and brought Sabrina up. We danced up the rest of the pitches and took a snack break on Broadway before tackling Boomstick Crack.
Sabrina balked at the opening crux moves, but I wouldn't succumb to her pleas of leading it. She got the moves and made quick work of the rest of the pitch. I climbed up to her and dispatched the remaining bit before untying in the woods. We kept our rock shoes on and scrambled up to the base of Squamish Buttress. We stopped for a bit in the forest to have lunch and then arrived at the base.
I took the first lead. But we allowed a quicker team to go first before I left the ground. That was pretty much the last we saw of them. The opening moves of the first pitch are easy gaining a roof, but then there are some thin moves to a bolt, and then even thinner moves above the bolt, the crux of the pitch. I took a bit to unlock the moves and then I was on my way. I combined the first two pitches and it got progressively easier as I went. However the protection opportunities were pretty scarce most of the way. I arrived at a tree belay and Sabrina soon joined me. She ran up around the corner to the next bit, and I followed. I set a belay and she led the next two pitches as one. These pitches were awkward bits with a few pro opportunities to protect them.
Once arriving at the belay, I poked around the corner to find the start of the North Face
 Variation. I found it, and Sabrina joined me. It was steeper than I imagined, but was completely doable by our party. I wanted to lead this 5.9 pitch as I wasn't too excited about the other one. But I often get spooked by steep climbing and had to work myself up to it. I took the rack and led off. A few pieces up and I was pumping and down climbed back to the base. I looked at the moves again and gave it another go. An adjustment of my top piece and my mindset, and I was higher and placing another piece. A few moves later I placed another piece and then it was up to a bolt. From the ground it looked as though the climbing got easier at the bolts, by this was untrue. A few moves leftward the climbing eased a bit and I gained the ledge. The remaining portion of the pitch was awesomely exposed climbing up steps on the ledge. It was amazing how quickly the gully floor dropped away after the short steep section. I belayed Sabrina up enjoying Ravens flying below me and the tops of trees down in the South Gully.
Since she was leading the next 5.9 pitch, I led the short bit to the tree and brought her over. I laughed when I saw the gaping maw that was the next pitch. She joined me and was startled by the look of it. She expressed her concern about leading it. I told her I would if she wanted me to. She did. We reflaked the rope and I headed off. This was supposedly the last 5th class pitch before reaching the top, but it was a considerable looking obstacle between us and the easier
 ground. I placed a nut and made the mantle move into the bottom of the scoop. I got a small suspect cam in between flakes near my feet and then entered the hole to place a blue alien in the back. I made a few moves and then placed a cam higher. I climbed back down as I was getting pumped and not unlocking the problem. I went up again with a better strategy and got higher, placing yet another cam in the deep back. I found a pocket in the back for a finger and I used holds on the arete with my right hand and foot. But trying to chimney the moves was proving difficult for me at best.
Was I in too deep? Were my long legs not suitable for the size of the crack? I felt I had to succeed as to not spend the night on the ledge. I moved up and was able to place the #1 cam listed on the topo. I was now in reach of the flake on the wall and grabbed it with my left hand. Now I had to turn my hip toward the wall. What to do with my right hand? I grabbed the draw, adjusted my feet and then grabbed the top of the flake and pulled myself up into an awkward stance on the next ledge. From there I placed a cam before continuing to a tree belay. Sabrina had no issues climbing the pitch and joined me on the ledge where we tried to figure out where the scramble ledges were supposed to go. Nothing looked like ropeless terrain to us, so Sabrina led out on the pitches at least attached to the mountain. Zig-zaging up the ledges she couldn't place any pro and stopped at tree. I came up and for some reason left without the rack on a perfectly protectable ramp that led to 2nd/3rd class terrain.
Once Sabrina joined me we put away the rope. A short 3rd class scramble got us to some easy slabs where we stopped to enjoy the view and have some snacks. Now the task was to find the tourist trail down. We poked around on slabs a bit before attaining the trail. Sabrina led us onto an exposed trail that went down a needly ramp. I didn't want to go and told her I thought the best way to go down was to go up. I liked a short gully heading up and went back to climb it. She reluctantly followed. Near the top of the gully was some third class moves with some rebar in the rock via ferrata style. After topping out of the gully we were on the summit area and I proceeded to the top while Sabrina scouted the descent.

It was nice to finally be on the summit and in direct sun for the first time all day. We chatted a bit with a "reporter" who said she was interviewing Sonnie Trotter about the route. Then it was off down the trail. The trail down was enjoyable. Plenty of stairs, a few ladders and chains and some nice trees. The most beautiful thing about it is that it deposited us right at camp, and our car so we could drink fluids and start making dinner.
This was a great trip. We didn't accomplish as much as we were hoping, but what we did accomplish was great fun. I was glad to be out on what may be my only multi day trip of the year.
The rest of the pics are here.


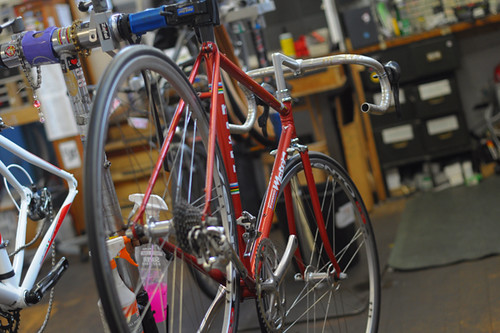 So I bought my Francesco Moser frame back from the person I sold it to, and built it up as a geared racing bike with modern components... despite having sworn off vintage roadbikes earlier. Yeah, I know. Allow me to provide some context:
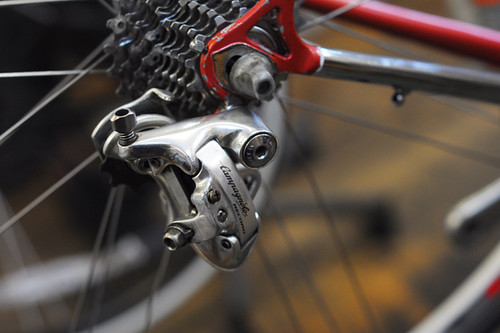 For what it's worth, I still believe that it is not financially practical for a "civilian" (i.e. a person who is neither a wrenching enthusiast withspare modern groupsets lying around, nor someone withbike industry connections), to take on a project like this. However, I have not really been a "civilian" for some time: I am interested in bikes not only for personal use, but also for the sake of learning and writing about them onLovely Bicycle. And I do at this point have industry connections, as well as readers who are interested in making specific projects happen. All of these factors played a role here.
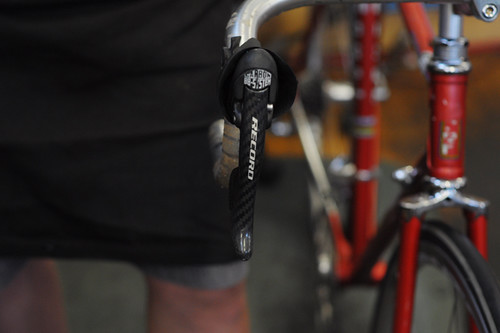 The second-hand components I received were a 9-speed Campagnolo Record drivertrain and levers circa (I believe) 1999 and a Campagnolo Vento wheelset of similar vintage. I already had the headset, stem, handlebars, tires and seatpost among my own spare parts. I bought a new bottom bracket, brake calipers, cable housing and bar tape at Harris Cyclery and they built up the bike for me.
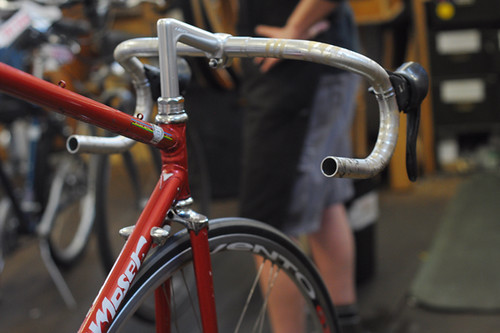 I am glad to have theMoserback; in a number of ways it is an even more unique bicycle than I thought.I hope to share my impressions in the coming week and fingers crossed that it doesn't start snowing in the meantime.Stay tuned, and a huge thank you to everyone who's helped me with this project!


 This sign sits in the park or town square in Old Town Albuquerque, New Mexico. My friend and I decided to take a walking tour around the shops and sights while she was visiting on July 15, ... She had never been but I have been going now and then ever since I was born. Although it has been about seven years or so since I was last there with my two aunts on one of their trips to Albuquerque. http://www.albuquerqueoldtown.com/ The town of Albuquerque was founded in 1706. The church of San Felipe de Neri Church sits on one side of the square and the other three sides are full of shops, and cafes, as well as one old, large, and famous restaurant named La Placita. When visiting you need to remember that Old Town now is mostly for the tourist trade and prices may be higher here than in other, more modern, parts of Albuquerque. There are lots of gift shops, jewelry stores, and artist shops and galleries. Some shops have the cheaper tourist trade gift items but lots of unique, and very high quality items can be found in other shops.
 My Campsite.
 The Erickson/Riggs home at Faraway Ranch, Bonita Canyon.
 Beyond Bonita Canyon are the mountains. The trails wind through the incredible rock formations – pillars and balancing rocks galore! It is a wondrous place, indeed.


 The Co-Habitant has recently acquired a gorgeous vintage Roadster. The bicycle itself was in great condition, but the B72 Brooks saddle seemed to be a goner -- hard as a rock, with cracks on the verge of forming all over the surface. Rather than give up on the saddle, he decided to try the lacing technique. Lacing can rescue saddles that have become rigid and brittle with age: It holds the shape of the saddle under pressure of the cyclist's behind, allowing the leather to slowly regain its flexibility. Here is how it is done:
 A dried-out saddle should first be treated with Neatsfoot oil. If the saddle is rescuable, it will begin to soften. Take care not to use too much oil, so as not to oversaturate: Rub the saddle with a cloth or napkin, never soak.
 Punch several holes on each side of the saddle, through which the laces will be threaded.
 Thread the laces through the holes, overlapping them underneath and pulling the two sides of the saddle closer together -- like tying a shoe. The traditional method is to use a long strip of leather, though some use shoe-laces.
 The tightness can be adjusted, like a corset, to control the shape of the saddle. Afterwards, the laces are tied in a secure knot.
 This is what the saddle looks like in the end. The stiching itself can be executed in several different ways. The Co-Habitant likes the "underneath" stitch, but the side-to-side stitch is also popular.
 And voila: an ancient B72 saddle rescued and happily returned to its proper place. It has not cracked after being riden on. Happy saddle, happy Roadster, and happy Co-Habitant.